

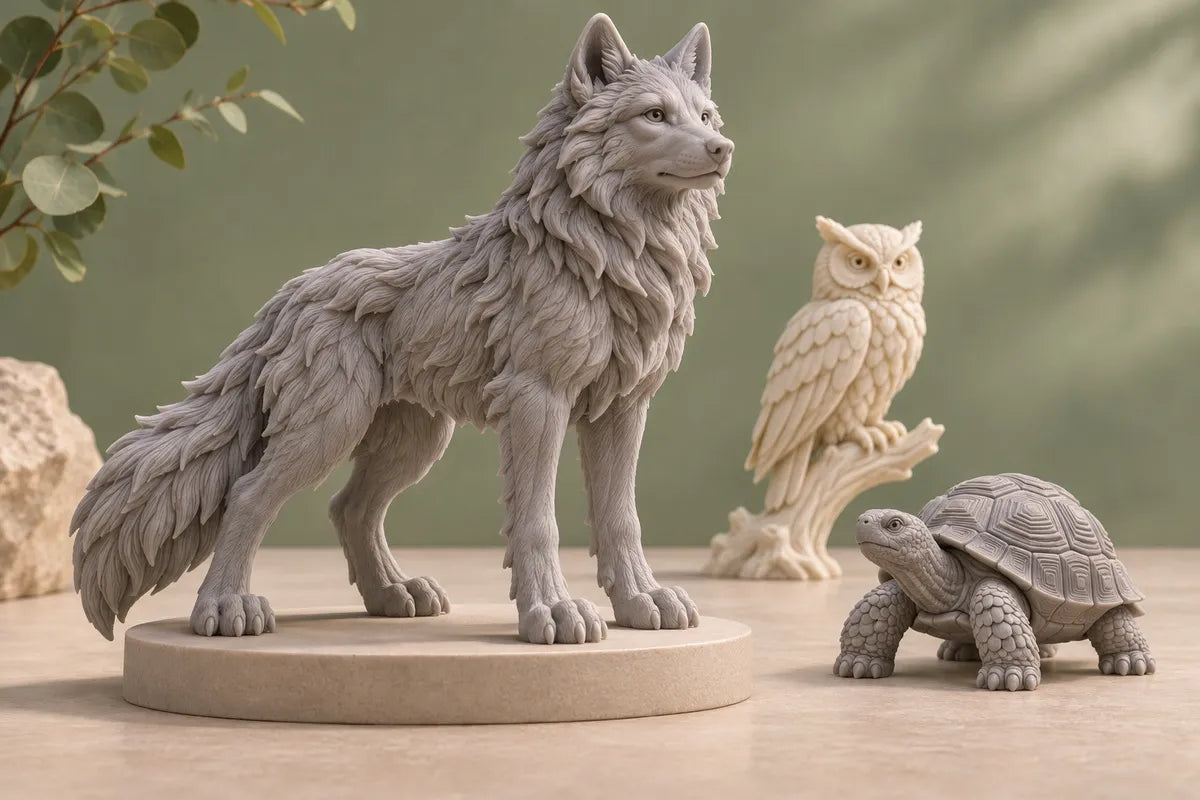
A convincing animal figure starts with an expressive silhouette. Its character comes alive in the fur, feathers, eyes, and tiny transitions that survive printing, cleaning, and paint.
From a watchful wolf to a miniature owl, 3d printed animals give sculptors, painters, and collectors a way to turn digital wildlife into objects worth displaying. The challenge is preserving the animal’s personality through every stage of production. An excellent sculpt can still lose its expression if supports scar the muzzle, resin collects between feathers, or thick primer fills shallow texture.
This guide explains how to choose printable animal 3d models, prepare fragile features, plan orientation and supports, and finish resin animal figures without sacrificing the detail that makes them collectible. It also looks at where the HeyGears RS Turbo fits into this workflow.

What Makes an Animal Sculpture Feel Collectible?
The strongest detailed animal sculptures communicate at two distances. From across a shelf, the pose, proportions, and silhouette identify the animal. Up close, the eyelids, paw shapes, feather edges, and skin folds reward inspection. Surface texture should support the anatomy: fur flows around the shoulder, feathers overlap along the wing, and scales follow the body’s form.
Before focusing on tiny grooves, check the larger shapes. A wolf needs a convincing muzzle and stance. An owl needs a readable facial disc and layered body volume. A tortoise depends on the relationship between its shell, neck, and feet. Printing every hair cannot compensate for an awkward pose or misplaced eyes.
For collectible figures, the base matters too. A compact rock or simple plinth can stabilize narrow legs and establish a display angle. Keep it proportionate so it supports the composition without hiding the paws or overwhelming the animal.
Choose Animal 3D Models That Will Work at Your Display Size
Confirm that the detail is actual geometry
A beautiful rendered preview may rely on textures, lighting, or normal maps. Those effects do not automatically become physical relief in an exported mesh. Inspect the printable file in a neutral, untextured view. Fur channels, eyelid rims, shell divisions, and feather overlaps must exist as geometry if you expect them to print.
Check the model’s intended scale and file units before resizing it. Shrinking a large sculpture reduces every ear edge, claw, and joint clearance along with the body. At small sizes, grouped fur clumps and slightly stronger eyelids often read better than many shallow lines. If a feature becomes too delicate, thicken it, merge it into an adjacent shape, or increase the figure’s size.
Repair the mesh and plan the assembly
Look for open edges, reversed faces, overlapping shells, and disconnected pieces. Repair tools provide a starting point, but inspect the result: automated repairs can close an intentional opening or remove a thin detail. Review the sliced layers to catch floating islands that are hard to see on the surface.
Separate antlers, wings, tails, or bases when doing so improves orientation and cleanup. Place joins along natural boundaries, such as a shoulder fold or the underside of a tail, and use keyed connections to make alignment easier. Print a small joint test before committing to a large multi-part sculpture; clearance depends on the material, orientation, and process.
If you plan to sell finished figures, confirm that the model license permits commercial physical prints and check any attribution requirements.
Design Details to Survive Printing and Painting

| Feature | What makes it readable | Preparation priority |
|---|---|---|
| Fur and manes | Clumps with clear direction and depth | Avoid unsupported individual strands; preserve channels between larger forms. |
| Feathers | Layered overlaps and distinct outer edges | Strengthen thin tips and inspect islands beneath overlapping layers. |
| Eyes and muzzle | Defined eyelids, nostrils, and mouth transitions | Keep support contacts away from the main viewing side of the face. |
| Scales and shell plates | Consistent relief that follows the body | Check that shallow grooves remain visible at final scale. |
| Antlers, claws, and tails | A clean silhouette with durable connections | Reinforce roots, simplify fragile tips, or print separately. |
Consider the finishing process while editing the sculpt. Fine grooves need enough depth to remain readable under primer. Very sharp projections need enough substance to survive support removal and handling. There is no universal minimum thickness that suits every animal, resin, and printer: validate the most fragile feature with a small test at the intended scale.
Match the Resin and Print Profile to the Figure
A resin 3d printer is well suited to small sculptural relief and curved surfaces, but headline resolution alone does not determine the result. Model geometry, exposure, layer height, support contact, material behavior, and cleanup all affect the finished animal.
Choose a compatible material that balances surface definition with the toughness your figure needs. A display bust and a slender deer with branching antlers place different demands on the resin. Neutral gray can make inspection easier, while material color alone does not establish detail capability.
Start with the manufacturer’s supported resin profile. Where validated profiles allow it, compare a standard layer setting with a finer one using the same small detail sample. Finer layers can help some sloped surfaces, but they do not restore missing geometry or guarantee stronger thin parts. Avoid changing several settings at once; otherwise, you cannot tell what improved the result.
Plan Orientation and Supports Around the Viewing Angle
Decide which side of the animal collectors will see first. Then orient the model to move necessary support contacts toward less visible areas, such as the underside of the belly, rear surfaces, or separate base. Protect the eyes, nose, chest texture, and other focal details wherever the geometry permits.
A slight tilt may improve access to the underside and reduce abrupt changes in layer cross-section. It is a starting point to evaluate, rather than a fixed angle for every species. A standing wolf, a spread-wing bird, and a broad tortoise shell create very different support and release conditions.

Use load-bearing supports where the figure first forms and where larger sections need restraint. Add smaller contacts for isolated fur tips, claws, and feather edges as needed. Removing supports indiscriminately to obtain a cleaner surface can leave features unsupported. Instead, adjust the orientation, separate a part, or move a contact to a less visible location.
Review the entire layer preview, especially the first appearance of paws, ears, antlers, and tails. Check that supports are accessible to cutters and that cutting them will not force a tool against an adjacent fragile feature.
Hollow only when the interior can be finished properly
Small figures may be simpler to print solid. For larger bodies or bases, hollowing can reduce material use, but it adds drainage, venting, cleaning, and internal-curing requirements. Avoid closed cavities and suction cups during printing. Plan accessible openings and verify the hollowed slices before generating supports.
Do not seal a shell while liquid resin or wash solvent remains inside. If you cannot reliably clean, dry, and post-cure the interior according to the material guidance, redesign it as accessible sections or reconsider hollowing. Formlabs also highlights the extra washing attention required by hollow and chambered parts in its wash-and-cure guidance; use your own resin manufacturer’s procedure for actual settings.
Post-Processing: Keep the Texture You Printed
1. Wash the recesses, then dry thoroughly
Use the cleaning liquid, wash method, and duration specified for the resin. Give particular attention to fur channels, the space beneath a jaw, feather overlaps, and any accessible cavities. Residual resin can cure into those recesses and obscure the sculpt. Avoid assuming that a longer soak is always better.
After cleaning, let the figure dry completely before post-curing. Inspect under angled light for glossy residue or trapped liquid. Use ventilation, eye protection, and resin-compatible gloves as specified by the material’s safety data sheet. Keep resin-contaminated liquid out of household drains.
2. Remove supports in the sequence your material requires
Follow the material and equipment instructions for whether supports should be removed before or after post-curing. Early removal can make some contacts easier to cut, while retaining supports can help delicate shapes resist deformation during curing. Formlabs discusses this tradeoff in its basic finishing guide; its settings should not be transferred directly to other resin systems.
Support the animal’s body in your hand and cut the support network into manageable sections. Work toward the contact points without twisting a whole tree away from a thin leg or antler. Leave a small nub when necessary and refine it carefully, instead of tearing out a crater.
3. Cure, refine, and inspect the surface
Apply the recommended post-curing conditions for your material and equipment, including any procedure for accessible internal surfaces. Extra curing time is not a substitute for correct cleaning or a validated profile. Check separate pieces for fit after the required processing, before gluing them together.
Refine support nubs locally with fine abrasives or a suitable precision tool. Preserve surrounding fur ridges and feather edges rather than sanding a broad patch flat. Follow the material guidance for dust control. Fill assembly seams sparingly and restore the adjacent texture before priming.
4. Prime lightly and paint with the sculpt
Apply thin primer coats and inspect after each one. Heavy primer can soften the eyelids and fill the grooves you worked to preserve. A thin shadow wash can emphasize fur direction, while restrained highlights can pick out feather layers and shell edges. Avoid flooding fine detail with paint or varnish.
Before mounting the finished animal, check that every foot or locating peg seats correctly and that the base stands steadily. Examine the face, silhouette, support-contact areas, and seams from the intended display angle.
Where the HeyGears RS Turbo Fits
The HeyGears UltraCraft Reflex RS Turbo is an option for creators building a resin workflow around detailed animal collectibles. HeyGears describes an upgraded Amber Screen, a C5-grade Z-axis module, and automatic preprocessing with model repair and support generation on its official RS Turbo overview.
For an animal sculptor, the practical approach is to use those preparation tools as a starting point, then inspect the facial details, thin features, and every support contact in the sliced file. Evaluate a representative sample through washing, curing, and primer before printing a complete collection. The figures shown in this article are conceptual illustrations, not RS Turbo test results.
A Final Checklist Before Printing a Collection
- Model: confirmed scale, printable geometric texture, repaired mesh, and permitted use.
- Structure: reinforced thin features, accessible joins, and a stable display base.
- Preparation: supported islands, protected focal surfaces, and accessible drainage where hollowed.
- Process: a compatible resin profile and a successful detail test at the final scale.
- Finish: clean recesses, complete drying and curing, controlled support cleanup, and thin primer.
The most compelling 3d printed animals preserve character throughout the workflow. Start with a convincing sculpt, prepare its delicate features thoughtfully, and treat finishing as part of detail creation. That is how a digital animal becomes a collectible figure with a clear expression and a surface worth looking at closely.
Share:
What Is the Best 3D Printer for Repeatable Results?