
Custom keycaps have turned out to be one of the most expressive ways of customizing keyboards. From simple designs to intricate works of art, keycaps have turned out to be an avenue through which keyboard enthusiasts get to make their keyboards uniquely theirs.
In 2026, 3D printing technology has advanced significantly, especially resin printing. Creating custom keycaps at home has never been easier. This applies to both beginners and experienced keyboard enthusiasts. This guide will cover everything you need to know regarding custom keycaps.
Why Choose 3D Printing for Custom Keycaps
Before getting into the tools and workflow, it’s important to understand why 3D printing has become such a popular choice for custom keycaps.
Limitless Design Customization
3D printing removes the traditional limitations of keycap design, allowing you to create truly unique shapes, textures, and artistic concepts that would be impossible with mass production. From sculpted artisan keycaps to highly personalized layouts, every detail can be tailored to your vision.
Ideal for creators, collectors, and custom keyboard enthusiasts
Low Cost Personalization
Unlike injection molding, which requires expensive tooling, 3D printing allows you to produce custom keycaps without any upfront mold costs. This makes it highly cost-effective for:
-
One-off designs
-
Small batch production
-
Custom orders or niche themes
You can create unique keycaps without large investment
Rapid Prototyping Efficiency
3D printing enables a fast design-to-product workflow, allowing you to prototype, test, and refine keycaps in a matter of hours.
You can quickly:
-
Fit testin (stem compatibility)
-
Ergonomic adjustments
-
Design improvements
Perfect for iterative design and product development
The Essential Tools and Materials for 3D Printed Keycaps
Before printing your first keycap, it’s important to gather the necessary tools and materials.
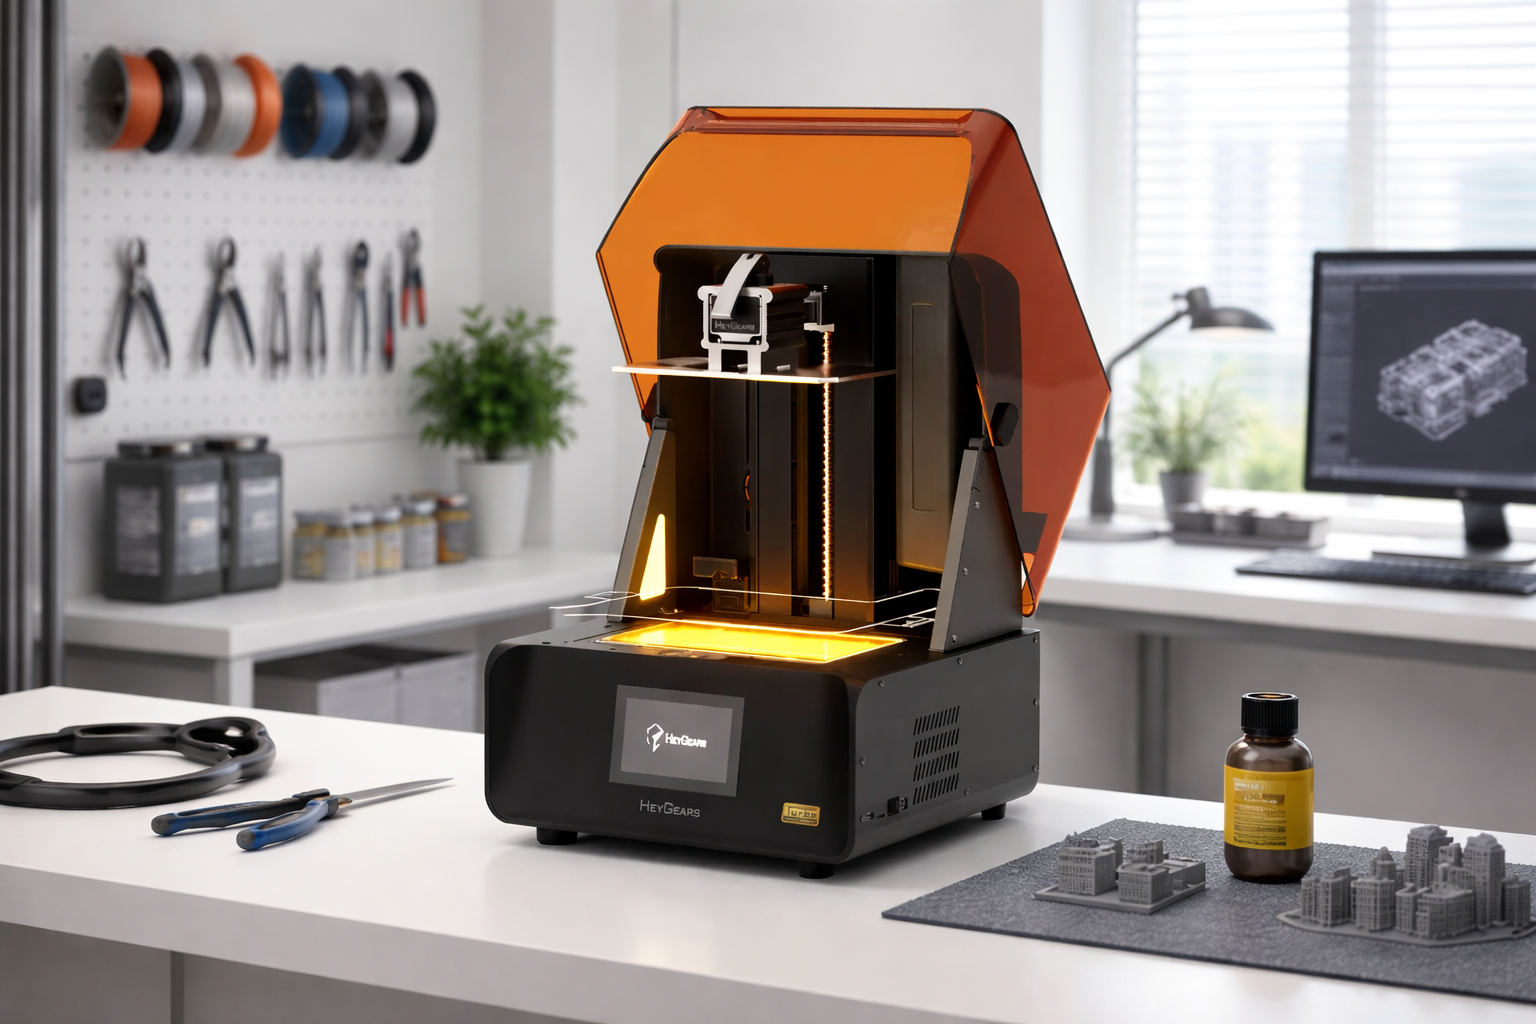
Selecting Resin 3D Printers for Beginners
For keycaps, resin printing is strongly recommended due to its superior detail and smooth surface finish. A standout option is the Reflex RS Turbo 3D Printer, which delivers several key advantages. It provides micron-level precision that results in flawless surface quality, along with a C5 Z-axis that ensures stable and accurate vertical movement.
The printer also features a heated resin tank to help prevent bottom-layer expansion during printing. In addition, it offers excellent stem fitment consistency, which is essential for producing keycaps that fit securely and function properly. These features are especially important when printing keycaps, where even slight inaccuracies can affect how the key fits onto a switch.

Choosing the Right Resin for Durable Keycaps
Material choice is just as important as the printer.
UltraPrint-Production PAP10 (Precise Detail Resin)
-
Ideal for capturing micro-details in artisan keycaps
-
Produces sharp edges and fine textures
-
Great for sculptural designs
UltraPrint PAT10 (Transparent Resin)
-
Perfect for RGB keyboards
-
Allows light diffusion for glowing effects
-
Ideal for legends or translucent designs
Using the right resin, such as the PAP10 or PAT10, ensures your custom keycaps deliver on both durability and visual quality.

Finding and Downloading Keycap STL Files
If you’re not designing your own models yet, you can find keycap files on popular 3D model platforms. You should look for MX-compatible stems, verified dimensions, and positive user feedback. Alternatively, you can design your own using CAD or sculpting software like Blender or ZBrush.
Gathering Essential Safety Gear and Post-Processing Tools
When it comes to resin printing, safety is essential. You need nitrile gloves, safety goggles, good ventilation, wash containers (water or IPA depending on resin type), and UV curing station. Never underestimate safety, especially when dealing with resin that has not been cured.
Preparing Painting Supplies and Keyboard Testing Tools
To complete your keycaps, you should gather fine sandpaper, acrylic paint, brushes, primer, clear coat, and mechanical keyboard. These tools will help streamline your entire process.
The Step by Step Guide for 3D Printing Custom Keycaps
Next, we’ll go through a step-by-step guide to 3D printing custom keycaps.
Step 1: Orienting and Supporting Your Model
Orienting is a key step in the printing process, and it should be done correctly. Best practices for orienting your keycap model include tilting the keycap at a 30–45° angle to reduce suction forces and improve print quality.
Supports should be placed on non-visible areas to keep the final surface clean and visually appealing. It is also important to avoid positioning flat surfaces directly facing the build plate, as this can lead to visible defects and poor surface finish. This minimizes suction forces and ensures surface quality.
Step 2: Printing and Monitoring First Layers
Start printing and then monitor the first few layers of the keycap. You should check for adhesion of the keycap to the build plate, clean layer formation, no shifting or detachment. The first layer is crucial for the overall printing of the keycap.
Step 3: Washing and Removing Supports Safely
After printing, knowing exactly how to wash and clean 3D resin prints is crucial. And remove the supports safely as follows:
-
Wash the keycap thoroughly
-
Carefully remove supports using flush cutters
-
Avoid applying excessive pressure
Removing supports when the keycap is slightly soft (before it fully cures) is recommended to prevent damage.
Step 4: Curing for Maximum Durability
Curing helps to harden the resin. Some helpful tips for curing include following the manufacturer’s recommended curing time for the resin to ensure proper strength and stability. It is also a good practice to rotate the object during curing so that all sides receive even UV exposure.
Be careful not to over-cure the print, as excessive curing can make the material more brittle and prone to cracking. Curing helps to create long-lasting keycaps.
Step 5: Sanding for a Smooth Finish
Sanding helps to achieve a smoother and more refined finish on your keycaps. Start with a lower grit such as 400–600 to remove rough edges and visible imperfections.
Then gradually move to finer grits like 1000–2000 to further smooth the surface. Be sure to carefully remove any support marks during this process to ensure a clean and polished final appearance. Polishing may be necessary for transparent keycaps.
Pro Tips for Painting and Sealing Your Artisan Keycaps
With the keycaps ready, the next step is adding color and a protective seal. We will cover how to paint resin 3D prints for a professional finish to improve both durability and style.
Priming the Resin Surface for Better Adhesion
Primer serves as a base for painting, ensuring a smooth surface for paint application. Benefits are better paint adhesion, smoother paint finish, and better paint color accuracy Apply coats evenly, then let it dry completely.
Applying Thin Acrylic Layers for Small Details
When painting your keycaps, apply paint in thin coats to avoid obscuring fine details. Build up the colors gradually to achieve even coverage and better control over the final look. Use fine brushes for painting to handle small areas and intricate details more precisely. Thick paint coats prevent visibility of small details in the design. This calls for patience in painting.
Sealing the Final Design with a Protective Clear Coat
A clear coat offers protection for the final design, ensuring increased durability. Available options are matte finish for small designs and glossy finish for bright designs. This step also ensures the design remains intact after repeated use.
FAQ
What Are the Differences Between Custom and Artisan Keycaps?
Custom keycaps are made with the objective of usability and aesthetic value, usually mass-produced or simple in design. Artisan keycaps are intricately detailed, sculptural, often hand-painted, and unique. Artisan keycaps are basically mini works of art.
Can I Use an FDM Printer Instead of a Resin Printer?
Yes, with certain limitations. FDM Printers are generally cheaper and simpler to operate, are not good at producing fine details, and have layer lines. Resin printers are highly recommended if you want professional-quality keycaps.
Why Do My 3D Printed Keycaps Feel Sticky After Curing?
This is usually the case when the keycaps were not properly washed, i.e., not completely cured. You can rewash the keycaps or cure them again under the UV light. A sticky surface is a sign of an uncured resin, which is not safe.
How Long Do 3D Printed Resin Keycaps Last?
If using appropriate 3D printing materials that cure correctly, they can last months or years with normal use. And the lifespan depends on 3D printing resin type. Engineering-grade resins are great at improving longevity.
Do 3D Printed Keycaps Fit All Mechanical Keyboards?
Most 3D printed keycaps use MX switches, as they are common. However, MX switches are not always used. Tolerances may not always be perfect
Conclusion
3D printing technology has revolutionized keyboard customization. With the right resin 3d printer, high-quality materials, and a bit of patience during post-processing, anyone can create mini works of art right at home. Whether you are printing a simple replacement key or an intricately painted artisan cap, the design possibilities are endless.
Share:
Do You Need to Vent ABS When 3D Printing?
How to 3D Print Fidget Toys: Top 5 Designs and Step-by-Step Guide (2026)