
You can build a custom guitar at home using 3D printing. You can control shape, weight, and internal structure. That opens up designs you normally can’t machine or build with standard methods.
At the same time, the print itself decides how well it holds up. Material choice affects stiffness and the body's behaviour under load. Print settings also matter, since weak layers or warping can lead to a poor fit and reduced strength.
In our work, we see many first builds fail for simple reasons. Low infill, poor layer bonding, and wrong orientation often cause cracks or flex. Once you dial these in, the build becomes much more reliable.
This guide walks you through how to print a working guitar at home. You will see what actually works on the shop floor, and what tends to fail.
The Top Benefits of 3D Printing Your Own Guitar
3D printing changes how the guitar body is built and tuned. It is not just about shape. It is about controlling stiffness, weight, and how loads move from the neck to the bridge.
In practice, most issues show up in structure, not looks. Weak zones, poor screw hold, and flex near the bridge are common. With printing, these can be fixed in the design stage.
Limitless Custom Body Designs
Complex geometry is much easier to handle in print. No concern about grain direction or tool access. Internal features can be added without extra setups.
-
Add ribs between the neck pocket and the bridge for stiffness
-
Reinforce screw zones to prevent thread stripping
-
Build internal channels for wiring without drilling
Drastic Weight Reduction
Weight control is precise with printing. Material can be removed where it does not carry a load. This helps improve balance and playing comfort.
-
Run 15 - 25% infill with 3 - 5 perimeter walls
-
Hollow large cavities while keeping load paths solid
-
Shift mass to reduce neck dive during play
Flexible Hardware Modularity
Hardware fit is easier to control at the design level. Small tolerance changes can prevent major alignment issues later.
-
Set neck pocket tolerance around ±0.1 - 0.2 mm
-
Adjust pickup cavities to the exact hardware size
-
Redesign bridge mounts without remaking the body
High-End Custom Guitars on a Budget
Iteration is where printing saves time and cost. Mistakes do not mean starting from scratch.
-
Reprint failed sections instead of the full body
-
Test fit parts before final high-density print
-
Iterate designs without machining cost
In our work, once structure and tolerances are dialled in, builds become consistent and repeatable.
Essential Gear and Materials for a 3D Printed Guitar
A solid build starts with setup. Printer limits, material, and fit decide how the guitar holds up. Most issues come from weak structure or poor alignment.
Choosing the Right FDM Printer (For Adequate Build Volume)
A larger build area helps reduce joints in the body. Fewer joints usually mean fewer weak points. Aim for a printer that can handle at least 300 mm in one direction.
Selecting the Best Filament (To Withstand String Tension)
PLA works for simple prints but can soften under load. PETG performs better under stress over time. Stiffer filaments help reduce flex around the neck and bridge.
Buying Hardware and Electronics
Use reliable, standard guitar parts. Low-quality hardware often causes tuning and fit issues. Make sure the neck, bridge, and tuners match your design before assembly.
Finding Quality STL Files
Finding a good model from reliable websites for free 3D printing STL files saves time and effort. Weak designs often fail around stress points, so look for models that properly support the neck, bridge, and screw areas.
How to Build Your 3D Printed Guitar Step by Step
The build comes down to structure, alignment, and fit. Most problems show up during assembly, not printing. If each step is handled right, the final setup becomes much easier.
Step 1: Optimizing Slicer Settings (For Maximum Strength and Resonance)
Print settings control how the body handles load. Weak layers or low wall count will fail near the neck and bridge. Strength matters more than print speed here.
In our work, a higher wall count makes a big difference. Around 3 - 5 perimeters and 20 - 30% infill work well for most builds. Print orientation also matters. Keep layer lines away from main stress directions to avoid cracking.
Step 2: Printing the Body Parts (Patience and Bed Adhesion)
Large prints take time and can fail late. Bed adhesion is critical, especially on long body sections. If the first layer shifts, the whole part is wasted.
Use a stable bed setup and slow first layers. Warping is more pronounced in wide, flat parts. In our work, adding a brim or raft helps keep edges down during long prints.
Step 3: Assembling and Glueing (Seamless Joints for Split Bodies)
Most bodies are printed in sections. The joint quality decides overall strength. Weak bonding leads to cracks under string tension.
Dry-fit parts before applying glue. Surfaces must sit flat with no gaps. Epoxy works better than basic adhesives here. Clamp evenly to avoid misalignment during curing.
Step 4: Installing the Neck and Hardware (Alignment is Everything)
This step decides playability. Small alignment errors affect string height and tuning. Once drilled, fixes are limited.
Check the neck angle and pocket fit before fixing it. The bridge position must match the scale length exactly. In our work, even a 1-2 mm error causes intonation issues.
Step 5: Wiring Electronics and Final Setup (Bringing Your Guitar to Life)
Wiring is straightforward but needs clean routing. Loose wires or bad solder joints cause noise and signal loss. Keep everything secured inside the body.
After wiring, focus on setup. Adjust string height, check intonation, and test tuning stability. This is where the guitar starts to feel right in hand.
The Resin Alternative for Advanced Guitar Upgrades
Resin printing is used for parts that need tight tolerances and smooth surfaces. It allows fine control over geometry, with lower layer visibility and better dimensional accuracy than FDM. You apply it where precision and surface quality matter more than bulk strength.
Selecting the Best Resin Printer and Tough Resins
Standard resin is too brittle for functional guitar hardware. To build parts that last, you need a precision resin 3D printer paired with engineering-grade materials designed for heavy impacts and constant friction.
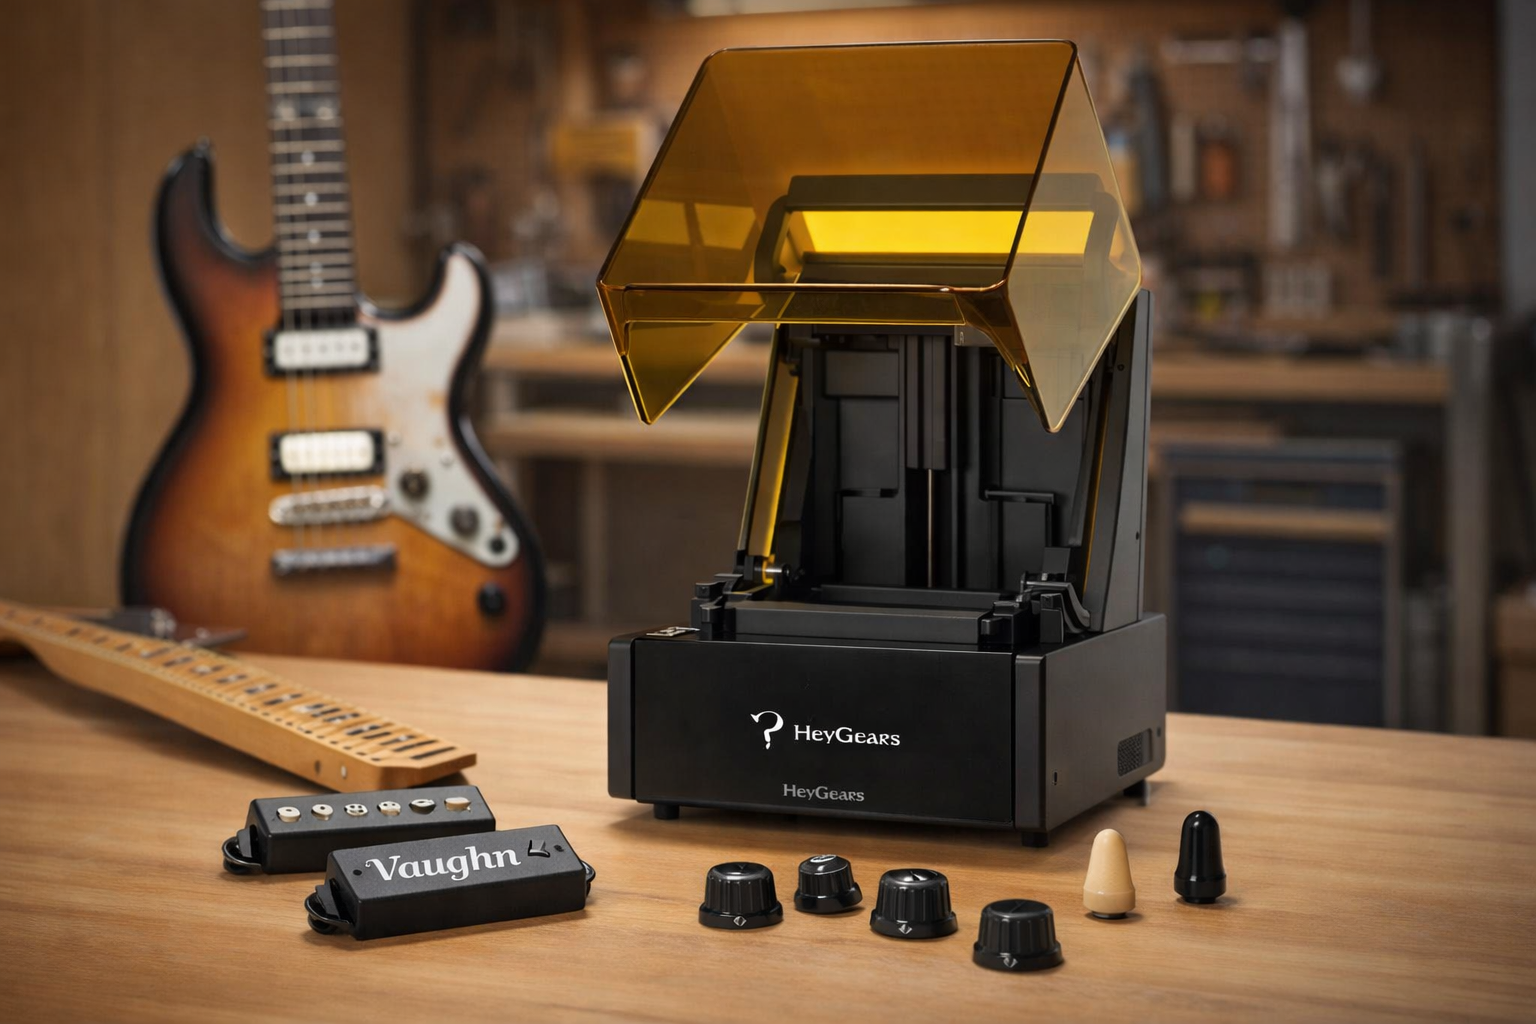
Reflex 3D Printer
-
Micron-Level Resolution: 10 - 50 µm layer height and 50 - 100 µm XY accuracy.
-
Precision UV Engine: 385 - 405 nm light source with exact layer-by-layer exposure control.
-
Mechanical Stability: Low-backlash Z-axis lead screw eliminates layer shifting.
By preventing over-curing, the Reflex 3D Printer guarantees strict dimensional accuracy. Precision parts such as fitted inlays, switch tips, and threaded knobs print exactly to spec straight off the bed, dropping right into place with zero heavy sanding.

UltraPrint-Production PAWR10 Wear-Resistant Resin
-
High Surface Hardness: Drastically reduces the wear rate under repeated friction loading.
-
Controlled Shrinkage: Maintains exact dimensional accuracy during UV curing for a consistent, tight fit.
-
Compressive Strength: Stays stable under constant contact stress cycles, outperforming standard resins.
PAWR10 is built for hardware that sees constant handling. High-touch components such as volume knobs and pickup switches maintain their low surface roughness and structural integrity, surviving the daily wear that quickly ruins standard prints.

UltraPrint-Modelling PAU10 ABS-like Resin
-
Dynamic Load Bearing: A modified polymer matrix delivers a balanced modulus and high tensile strength. The increased elongation at break drastically improves impact resistance for load-bearing small components.
-
Mechanical Post-Processing: It overcomes standard resin brittleness to fully support physical modifications. You can safely drill, tap threads, and sand the material without shattering the final print.
This makes PAU10 the perfect choice for functional guitar parts. It easily handles metal screws, tight assembly, and aggressive handling.

Product Comparison Table
|
Product |
Type |
Technical Specs |
Mechanical Properties |
Application |
|
Reflex 3D Printer |
Resin Printer |
385-405 nm UV, 10-50 µm layers, 50-100 µm XY resolution, precision Z-axis |
High dimensional accuracy, stable curing |
Precision guitar parts |
|
UltraPrint-Production PAWR10 Wear-Resistant Resin |
Resin Material |
High hardness, low shrinkage, controlled curing, smooth finish |
High abrasion resistance, surface durability |
Knobs, switch tips |
|
UltraPrint-Modelling PAU10 ABS-like Resin |
Resin Material |
High tensile strength, improved elongation, and machinability |
Impact resistant, less brittle |
Functional components |
As the table above shows, you must match the right gear to the right component. Choose the Reflex resin 3D printer for micron-precision, PAWR10 for constant friction, and PAU10 for load-bearing hardware.
Top Custom Guitar Components to Print with Resin
Resin printing works well for small parts. It is perfect for achieving smooth surfaces and intricate details. You use it when accuracy matters more than strength.
Custom Knobs and Switch Tips
These parts get touched a lot, so finish matters. Resin gives a smooth feel and clean edges. Use a durable resin so the part does not wear out quickly.
Intricate Fretboard Inlays
Inlays need small details and sharp lines. Resin can capture fine shapes better than FDM. Keep the design simple enough to avoid fragile thin sections.
Personalized Pickup Covers and Logos
These parts are mainly for looks. Resin gives clean surfaces and sharp text or logos. You can match the design with the guitar style for a consistent look.
Maintenance and Care Tips for Your 3D Printed Guitar
Printed guitars need regular checks to stay stable. Plastic behaves differently from wood, so stress and heat are more important. Small issues can grow fast if ignored.
Monitoring Structural Integrity
Stress shows up first at joints and load points. The neck pocket, bridge area, and screw zones bear most of the force. Cracks or flex usually start there.
Check these areas regularly under light pressure. Look for hairline cracks or soft spots. In our work, early detection prevents full-body failure later.
-
Inspect the neck pocket for movement or gaps
-
Check the bridge mount for cracks or lifting
-
Test screw holes for thread wear or pull-out
Managing Temperature and Sunlight
Heat affects printed plastics more than wood. High temperatures can soften the structure and cause warping. Direct sunlight speeds up this process.
Store the guitar in a cool, shaded place. Avoid leaving it in cars or near heaters. Based on experience, even moderate heat can shift alignment over time.
-
Keep away from direct sunlight for long periods
-
Avoid high heat environments above 40°C
-
Store in a case when not in use
Cleaning and Polishing the Body
Printed surfaces collect dust and fingerprints quickly. The dirt can get caught between layer lines, so frequent cleaning can help keep the finish and grip in place.
Apply a light cleanser and cloth. Strong solvents should be avoided because they will destroy the plastic surface. In case of necessity, light sanding or polishing may be done.
-
Regular cleaning should be performed using a microfiber cloth
-
Use light soap; do not use aggressive chemicals
-
Slightly rub on rough parts where necessary
Adjusting the Action and Intonation
The setup affects how the guitar plays and sounds. Printed parts can settle slightly under string tension. This may shift action and tuning over time.
Check string height and intonation after setup. Small adjustments keep the guitar playing clean. In our work, fine-tuning makes a big difference in playability.
FAQ
How Long Does It Take to 3D Print a Guitar?
A full guitar body usually takes 20–60 hours to print. Time depends on layer height, infill, and wall thickness. Higher strength settings increase print time, while split designs can reduce it per part but add assembly work.
Is a 3D Printed Guitar Heavy?
Weight depends on how you set up the print. Lower infill reduces weight but can weaken the structure. Higher infill adds weight and improves stiffness, which also helps with stability during play.
Does a 3D Printed Guitar Sound Good?
Sound is determined by rigidity, material and fit with the parts. Strictness provides better vibration transmission, enhancing its tone and sustainability. Poor assembly, weak prints or loose joints decrease clarity and general sound quality.
Conclusion
3D printing gives you a practical way to build a guitar at home. You are not limited by standard shapes or factory setups. You can control structure, weight, and fit from the start.
This guide breaks down the full process in a clear way. You will see how to choose materials, set up your print, and assemble the parts without trial and error. It focuses on what actually works during a real build, not just theory.
Share:
How to 3D Print Fidget Toys: Top 5 Designs and Step-by-Step Guide (2026)
3D Printed Dragon Egg: The Step-by-Step Printing Guide