
3D-printed miniatures are small, tiny models. They are typically made from a digital design file using a 3D printer and extensively used for tabletop games, character models, terrain pieces, collectibles, display models, armor, and weapons. However, printing miniatures requires an advanced 3D printer, appropriate materials, and the correct print settings.
This article covers:
-
The types of 3D printers commonly used for miniatures,
-
Suitable materials,
-
How miniature files are prepared for printing, and basic print settings for small models
-
Finishing steps are used to clean and improve the final printed miniature.
Why Are 3D Printed Miniatures So Popular Today?
3D printed miniature objects are becoming popular nowadays. They often take less time to produce detailed models without traditional manufacturing. In the past, creating miniature figures/items required molds, casting, and sometimes buying pre-made models.
With 3D printing:
-
You can download a digital model and change size or design as required.
-
Print out the paper in minimal time.
It enables the hobbyist, tabletop gamer, and designer to make their own custom characters. Some of the common examples include terrain pieces and display models without spending a lot of money on tooling.
Types of 3D Printed Miniatures
When you start printing miniatures, you may notice they usually fall into a few common categories. Some models are designed for gameplay. While other models are meant for painting, display, and building gaming environments.
Tabletop Gaming Miniatures
Tabletop gaming miniatures are tiny figures of characters. They are placed on a game board during play.
When you play role-playing or strategy games, these characters tend to be heroes and soldiers, monsters and NPCs. In most cases, gaming miniatures are printed at 28 mm or 32 mm size. This is the scale used by various tabletop games.
Resin 3D printers are preferable to those who intend to print such models themselves. Fine details like armor edges, weapons, belts, and faces can print clearly. Using a 0.03 - 0.05 mm layer height helps keep such details sharp.
Display Models and Busts
Certain miniatures are not even to be used in a game. They are instead printed to be painted, collected, or displayed. These models need to be larger in size so that you can see and paint more detail.
This category is predominant with bust models. A bust typically consists of the head and upper torso of a character only. This way, the sculptors can pay more attention to the details of the facial features and the texture of clothing. These models can be as large as 75 mm, and smaller layer heights can be used to retain fine sculpted details.
Tabletop Terrain and Scenery
Terrain pieces are the environmental parts you place on a gaming table. These are buildings, walls, ruins, trees, bridges, and tiles of dungeons. Terrain is used to transform a 2D table into a battlefield and a fantasy world.
Since the terrain pieces are larger in size, they are usually printed on the FDM 3D printers using PLA filament. These printers are capable of working with very large parts, and terrain does not normally need fine detail whatsoever when compared to character miniatures.
Modular and Custom Kitbashes
Some miniature files are structured in such a way that you can replace parts and create your own characters. You usually don’t print the whole model in one piece. Instead, you print separate parts like the head, arms, weapons, or backpack.
So that the parts can fit after printing, designers typically provide pegs, sockets, or flat connection surfaces. When you have the pieces, then you can glue them and come up with a special figure. This is known as kitbashing, and most of the time, you do not want your characters to look like the conventional models.
What You Need to Start 3D Printing Miniatures
For getting started with 3D printing miniatures, here’s what you should know beforehand.
Choose the Right Resin 3D Printer
Selecting the right resin 3D printer plays a crucial role in achieving high-quality miniature prints. Different printers offer varying levels of precision, stability, and automation features, which can significantly affect the final results.
For beginners, a printer with automated setup and reliable print stability can make the learning process much easier. More experienced users, on the other hand, may prioritize ultra-fine resolution, advanced curing systems, and better temperature control to capture even the smallest details.
Below are two excellent resin printers designed to deliver consistent results for miniature printing.
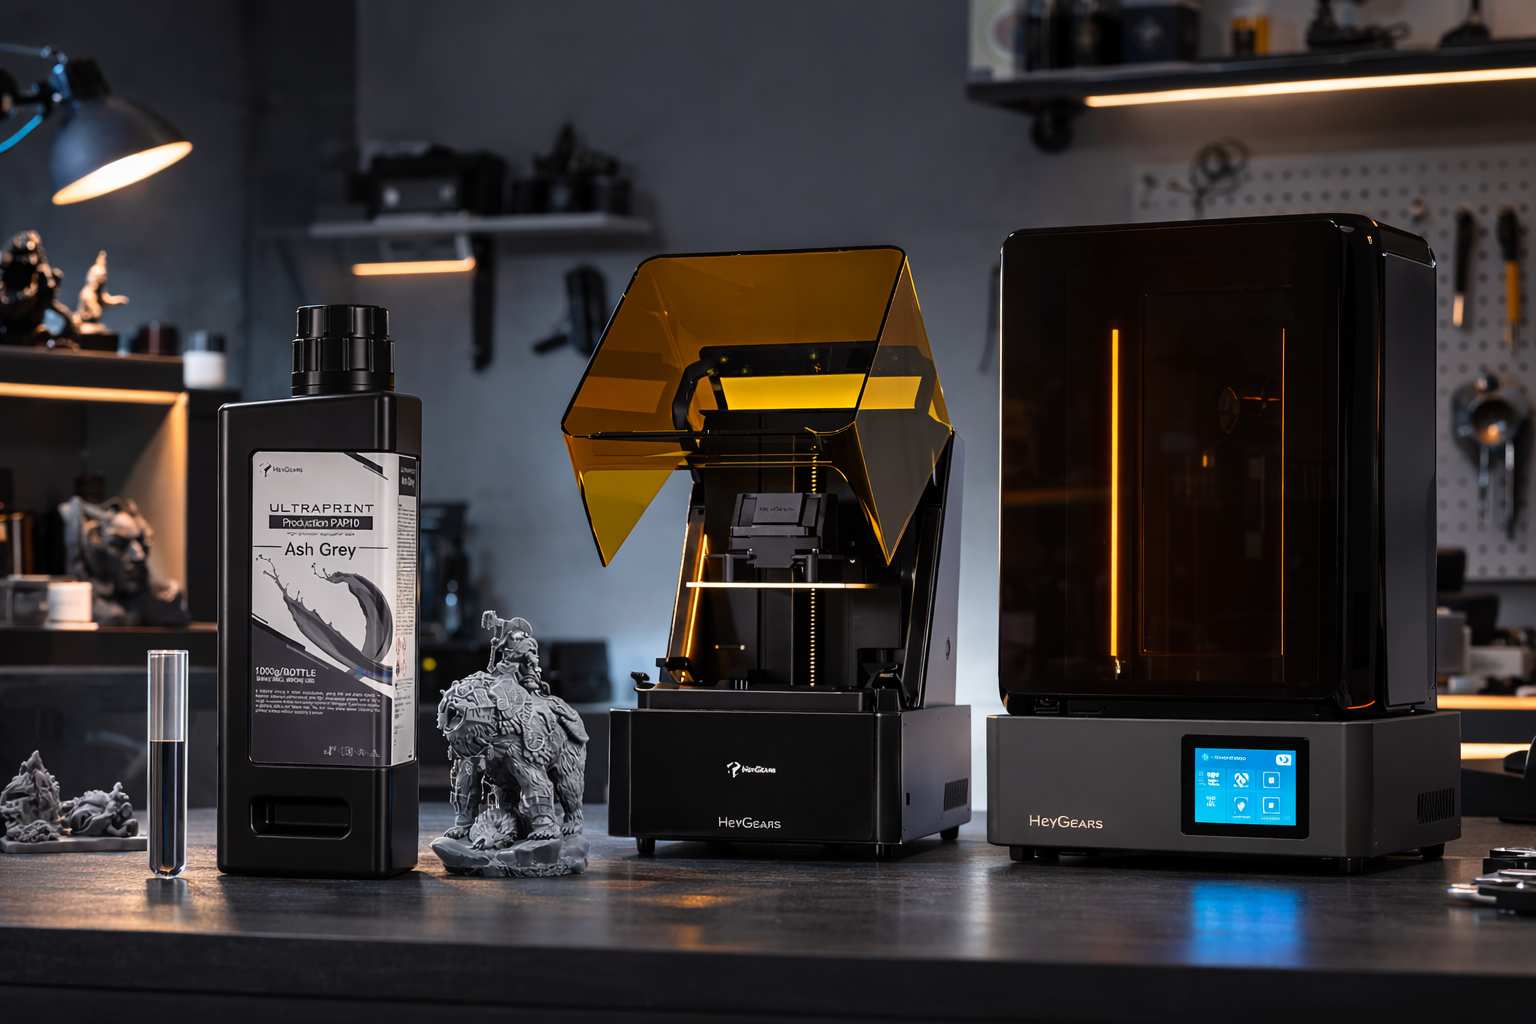
Reflex 3D Printer
If you’re new to printing miniatures, the Reflex is a great choice. It handles all the tricky stuff for you, like auto-leveling, resin detection, and heating the tray. It's 33 μm precision ensures your tiny details come out sharp, and AI-assisted peeling helps avoid common failures. You can print with almost any resin and get consistent, high-quality miniatures without challenges.

Reflex 2 3D Printer
Looking for even finer results? Reflex 2 takes it up a notch. It can move the Z-axis in super-precision (+/- 2mm), and has 161 mini-LEDs to provide uniform curing, and it has smart temperature control to maintain resin at the optimal temperature. Auto-leveling and residue detection mean you spend less time troubleshooting. If you want ultra-fine detail with fewer failed prints, this is your go-to printer.

Pick Your Safety Gear and PPE
You’ll be handling resin, so gloves, goggles, and a mask are a must. Keep your workspace ventilated, and always use a resin enclosure to stay safe and avoid fumes.
Choose Your Resin and Cleaning Solvents
For miniatures, UltraPrint Production PAP10 is ideal. Ash Grey is great if you plan to paint, while Black gives extra-sharp textures. You can print pillars as small as 0.1 - 0.15 mm with ±0.05 mm accuracy. The resin stays stable for years indoors and works perfectly with Reflex printers. Clean your prints with IPA or the recommended solvent; don’t skip this step.

Set Up Your Wash and Cure Stations
After printing, you need to wash and cure your miniatures properly. This allows you to remove sticky resin and ensures every detail is fully hardened, so your prints don’t warp and lose sharpness.
Get the Essential Hand Tools
You will need some essentials: spatulas, flush cutters, tweezers, sanding sticks, and miniature files. These simplify the support removal, smoothing, and preparation to paint.
How to 3D Print Miniatures Step by Step?
It is advisable to learn all the steps of model preparation until finishing before you begin to print. These steps are very important so as to give your miniatures a detailed, strong, and paintable look or displayable.
Step 1: Pre-Processing and Slicing Your Model
Check the errors in your 3D model, such as holes or inverted normals, before printing. Type in using slicing software to assign layer height, supports, and print orientation. The accurate slicing of the miniature prints improves the quality of printed miniatures and minimizes the post-processing needs.
Step 2: The 3D Printing Process
Load the printing resin or filament, adjust your printer settings, and press the print button. Place the printer on a virtual surface to prevent vibrations. The first layers should be monitored, as they are the key to adhesion and the success of the entire print.
Step 3: Washing the Printed Miniatures
Upon printing, knowing exactly how to wash and clean 3D resin prints is key to preserve the sharp details of your miniatures. Rinse off the uncured resin with isopropyl alcohol (IPA), and stir the miniature gently to clean all tight crevices. Washing helps to avoid sticky surfaces and enhances curing.
Step 4: Removing the Supports Safely
Removes supports using a hobby knife or flush cutters. Move slowly over sensitive parts to prevent fracture of thin ones. This step can be facilitated by the support placement during slicing.
Step 5: Curing the Resin Print
UV light should be exposed to the miniature within the recommended time. This completely cures the resin and fixes details, and makes it durable. One should not over- or under-curd the model, as it will make it brittle or soft, respectively.
Step 6: Polishing and Sanding for a Smooth Finish
Rub off coarse edges and polish lines with fine-grit sandpaper. A gentle brush and buffing tool are used to make it appear smooth. It is done before painting the miniature or displaying the miniature, and the details are not blurred.

Troubleshooting Common 3D Printing Failures
Even advanced amateurs can face problems during printing. Understanding the reasons why a problem occurs can save time and material. The following is a realistic manual on the most frequent failures and the ways of fixing them.
Build Plate Adhesion
Unless your miniature will adhere to the build plate, it may move or not at all. This normally occurs due to a dirty plate, an uneven plate, or the first layer being so thin.
Fix it by:
-
Wiping a build plate with isopropyl alcohol.
-
Level the plate carefully.
-
Add more height to the first layer or decrease the speed of the first layer.
-
FDM printers require the use of a glue stick or painter's tape with thin adhesive.
Support Failures
The overhangs and complicated forms require support. When they are broken or detached during printing, miniature bits may fall.
Fix it by:
-
Turning the density on or off on your slicer.
-
Supports are placed on the part lightly to prevent marks being left behind.
-
Orientation Checking Sometimes, a rotation of the model can minimize the overhangs.
Loss of Detail
Miniatures may become dull when there is too much more than one layer, or when the printer is not calibrated. Small details such as weapons, armor, or edges of the eyes can appear to be rounded or smooth.
Fix it by:
-
Decreasing layer height (e.g., 0.03 - 0.05 mm of resin).
-
Slowing print speed.
-
Make sure that your printer is X/Y and Z calibrated. Where possible, use the higher quality resin or filament.
Cracking and Splitting
There are occasions when prints break or pop up during or after printing particularly when the model is tall or thin. This actually occurs as a result of shrinkage, lumpy cooling, or resin curing stresses.
Fix it by:
-
Make sure that your print material fits the model size.
-
Modifying the exposure time or exposure of the resin prints.
-
Thickening the walls or inserting minimum internal supports.
-
Maintaining ambient temperature and preventing drafts in printing.
FAQ
What's the Difference Between FDM and Resin for 3D Printed Miniatures?
FDM printers are less detailed and slower, and use melted filament. Resin printers use light to cure liquid resin and create sharp and detailed miniatures, which are best suited to small features. For projects other than miniatures, comparing resin vs filament for 3D printing can help you choose the right technology.
Can I Set Up My 3D Printer in a Bedroom or Small Space?
Yes, always ensure proper ventilation, especially for the resin printer, and keep the area clean, stable, and away from direct sunlight or drafts.
Can You 3D Print Miniatures Without Supports?
Simple models are possible without any overhangs. Complicated shapes or figures, such as those with arms and weapons or floating parts, normally require supports to print properly.
What is the Safest Way to Dispose of Used Resin and Alcohol?
Pouring resin down the drain is not advisable. Allow the resin to cure completely and discard it as solid waste. Use strain and recycle alcohol where available, or use local rules on hazardous waste.
Is It Necessary to Prime 3D Prints Before Painting?
Priming is recommended. It aids in painting evenly, to cover the layer lines and to avoid peeling off, particularly within resin prints or FDM prints with rough surfaces.
Conclusion
When you have the equipment and materials required, it is much easier to begin with 3D printed miniatures than it appears. Using a good printer, such as the Reflex or Reflex 2, a detailed high-quality resin such as PAP10, and correct safety and finishing techniques will allow you to produce a high-quality miniature every time.
It is important to remember, however, that preparation and set up is as much as the print itself. After you have your working process defined, you will spend more time on painting and putting together your miniatures, and less time on troubleshooting the printer.
Share:
Best 3D Printers in 2026: Latest Tests and Results
3D Printing Book Stand: A Step-by-Step Guide for Beginners