A 3D printed magazine organiser keeps heavy magazines, files, and papers in one place. You can reduce clutter and make it easier to find what you need. Many people use it at home, in offices, and even at their workshops.
3D printing allows you to print only what is necessary; as a result, you can save on wastage of materials and spend less time.
This guide explains:
- How to design and print a magazine organiser
- Tips to get a clean and usable outcome
Benefits of 3D Printing Your Magazine Holder
Creating a 3D printer magazine holder implies that you can literally fit it to your stuff. You will no longer have to hold magazines in a squeezy little holder that is too tight or have to hold one that is too large to fit on your shelf. You can adjust the size, the shape and the appearance.
Customizable Dimensions for Various Formats
Your organiser can be made to the correct height, width, and depth of whatever you have: A4 magazines, brochures, or comic books. Simply leave a little more room so that things can slip in.
Design and Aesthetic Versatility
Desire it to be simple and clean on your desk? Or something the cutouts in, and with a place to put labels to? You can do both. You can even match its colors on your room to make it look attractive.
Scalability Through Modular Design
- Print smaller pieces that fit together.
- Add more sections later if you need.
- If a part breaks, it will requires reprint of that one piece.
Cost Efficiency and Sustainable Production
- You can avoid material waste, as you only use the material you need.
- It can be made strong without consuming filament or resin.
- It is relatively more economical than purchasing a set of ready-to-wear holders.
Essential FDM Preparation for Large Magazine Organisers
There is a bit of planning required to 3D print a large magazine organiser. You will need to take into account the size, strength, and print stability. Some minor alterations/adjustments before printing will prevent undesired prints and defective areas.
Choosing Rigid PLA or PETG Filaments
PLA is an easy material to 3D print. It is best suited for indoors. It provides uniform form and smooth sides. PETG is a more durable yet slightly flexible material. As an example, in case the holder will have to carry heavyweight magazines, PETG appears more resistant to stress and does not crack.
Splitting Models to Fit Your Build Volume
Large magazine organisers can not be printed on a standard printer. However, you can divide the design into smaller sections. These sections can be assembled in the future with the help of glue or basic connectors. This also simplifies the printing process and minimises the chances of failure.
Optimising Infill and Perimeters for Strength
To make the holder strong, you do not require 100% infill. The infill should be moderate (approximately 15-25%) with 2-3 perimeters. This makes the print resilient and robust and also saves on time and material.
Ensuring Bed Adhesion for Large Prints
Large prints can lift from the bed if adhesion is not strong. Use a heated bed, and also make sure it is well-balanced. To make the base stable, a brim or skirt can be added.
The 6 Practical Steps for 3D Printing Your Magazine Organiser
A magazine organiser is not hard to print; however, every step influences the outcome. A simple and cautious process is useful to prevent such typical problems as poor fitting or weak parts.
Step 1: Model Evaluation and Printability Check
Start by precisely evaluating your design. Ensure that the walls do not make the structure too thin and that the bottom is strong to support a heavy weight. Moreover, check through overhangs that might require support.
Step 2: Pre-Processing and Model Placement Principles
Next, place the model in a stable position on the build plate. Do not tip the model unless necessary. Proper positioning will improve load bearing and reduce the use of supports.
Step 3: Slicing Setup for Structural Integrity
Average infill and ample wall thickness should be used to carry the load. Make changes in layer height depending on the finish you desire. Lower speed may enhance the quality, particularly for large prints. Check the preview in the slicer before commencing.
Step 4: Print Execution and Crucial First-Layer Monitoring
Take out the print and observe the first layer. It must adhere and create smooth contours. The first layer should be right; if not, then it is prudent to stop and correct at the initial stages.
Step 5: Post-Processing and Safe Support Removal
Remove supports slowly after printing so as not to damag theme. Work with simple tools when required, but do not force parts off. Edges where the supports were joined must remain clean, so that the surface appears uniform.
Step 6: Functional Sanding and Final Assembly
The rough areas and fits between the parts can be sanded lightly. In case the design is divided into parts, stick them together using glue or connectors. Ensure that all is in place to allow the organiser to sit flat and hold things in their place.
Alternative Resin 3D Printing Guide for Small Magazine Organisers
Resin 3D printing is ideal for creating small magazine organisers with high precision, smooth surfaces, and durable functional parts. Choosing the right resin 3d printer, resin, and print orientation ensures reliable, professional-quality results.
Choosing the Best Resin 3D Printer
When printing durable desk accessories, stability and material compatibility are crucial. Here are two reliable options depending on your production scale:
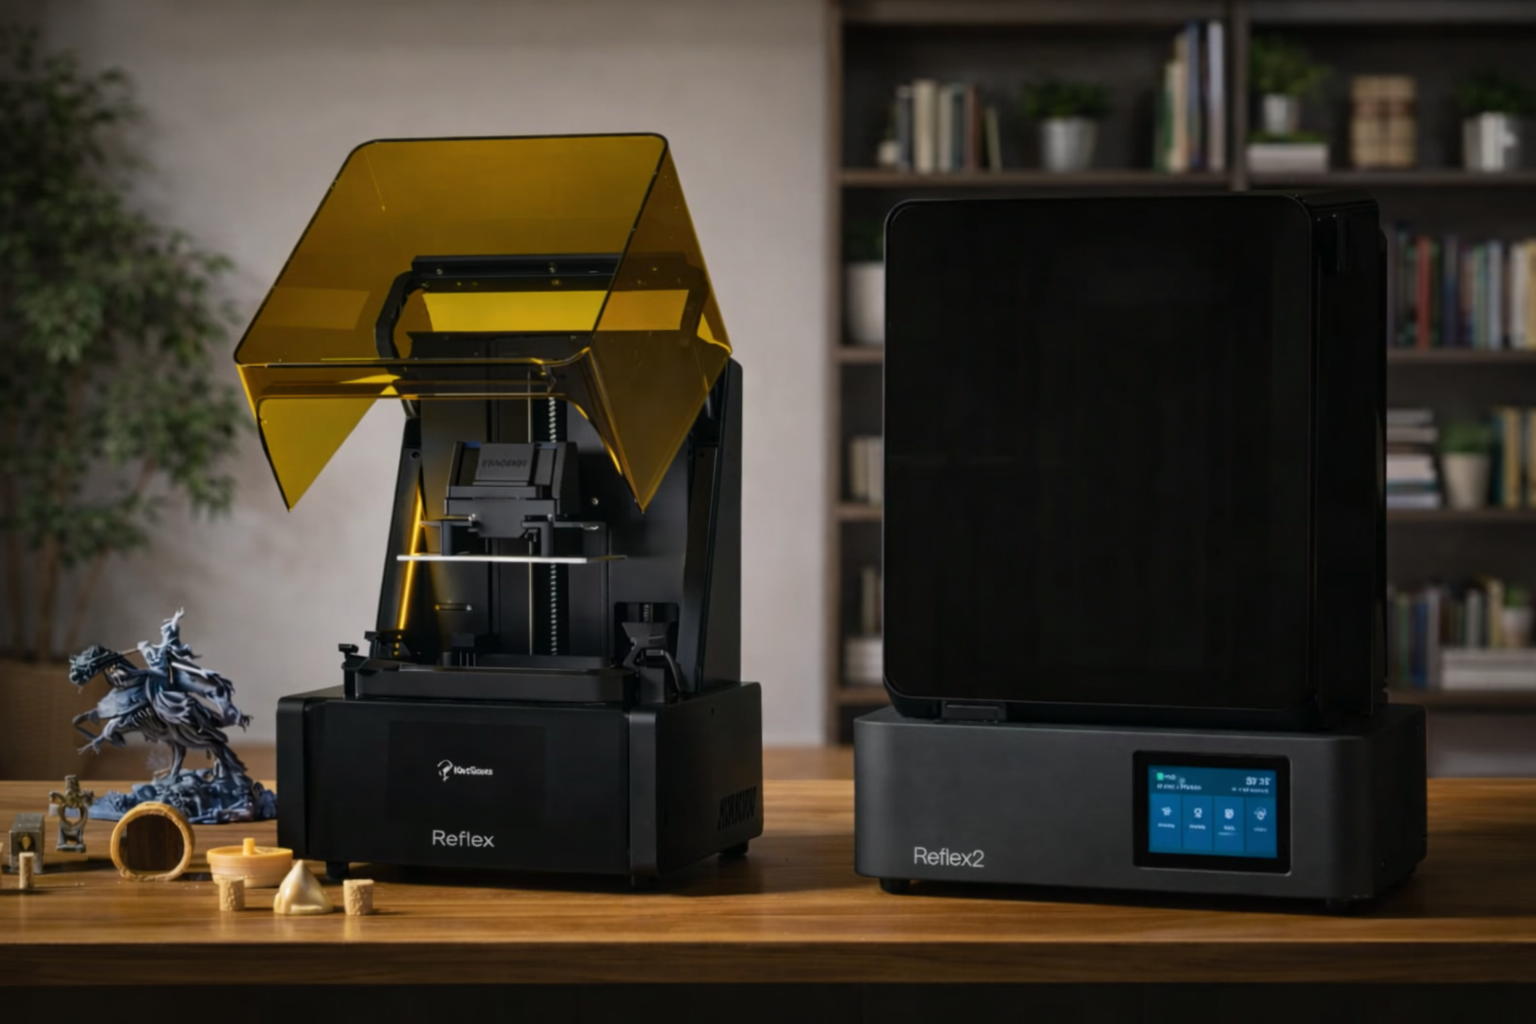
Reflex 3D Printer
Choose the Reflex 3D Printer if you are a hobbyist or professional who wants high-quality desktop prints with minimal setup.
Technical Specs:
- XY Resolution: 33 μm for sharp detail.
- Smart AI Peeling Force Management: Reduces layer failures.
- Auto Resin Level Detection & Heated Tray: Maintains optimal resin conditions.
- Detail Accuracy: 90.6% of surfaces meet ±0.05 mm tolerance.
- Build Volume: 191×121×220 mm: it is ideal for small organisers.
- Compatibility: Supports ABS-like, flexible, high-detail resins.
Reflex 2 3D Printer
Choose the Reflex 2 3D Printer if you need high productivity and precision 3D prints. It is ideal for small businesses and hobbyists producing multiple organisers or functional parts requiring consistent quality across prints.
Technical Specs:
- Screen: 10.7-inch 6K Amber with 161 OptiZone LEDs for uniform light.
- Z-axis Module: C5 grade, ±2 μm repeat positioning accuracy.
- Die-Cast Unibody Base: High stability and vibration reduction.
- Optional Resin Heating Scraper: Maintains ideal resin temperature and prevents sedimentation.
- Floating Build Platform Auto-Leveling: Corrects up to 0.15° inclination and 240 µm gaps.
- Residue Detection: 0.15 mm sensitivity, auto-stop on failures.
- Build Volume: 230×144×230 mm; it is suitable for small batch production.
- Material Compatibility: Wide range of high-performance resins.

Selecting Tough or ABS-Like Resins
A functional magazine holder requires impact resistance to survive daily use. Avoid standard brittle resins and opt for a durable alternative:
UltraPrint-Modelling PAU10 ABS-like Resin
Choose PAU10 ABS-like resin for functional organisers that need to handle weight or frequent use. It is ideal for mechanical parts, casings, and components where durability and impact resistance are required.
Technical Specs:
- Impact Resistance & Toughness: Resists cracking and breaking under repeated stress.
- Dimensional Accuracy: +/-0.1 mm ensures precise fits.
- Hardness: 81 Shore D for wear resistance.
- Mechanical Performance: Similar to injection-moulded ABS for functional parts.
- Applications: Screws, threaded parts, casings, functional magazine organisers.
- Durability: Maintains performance over repeated handling and use.

Splitting Models for Smaller Build Volumes
For larger organisers that exceed the printer’s build volume, split the model into smaller parts that can be printed individually and assembled later. This improves the print success and reduces material waste.
Hollowing Models and Adding Drain Holes
Hollowing parts helps minimise the resin usage and print time. Adding drain holes allows uncured resin to escape, preventing pooling and simplifying post-processing.
Angling Parts to Minimise Peel Forces
Tilting parts reduces suction between the print layers, lowering the chance of lift or failure. Proper angling also improves surface quality on the most visible faces of the organiser.
Creative Tips for Customising Your Magazine Holder
After the basic print is prepared, it can also be further improved by making a few minor adjustments to make it more attractive and useful. Here are mere additions that make the magazine organiser easier to place for day-to-day use.
Adding Anti-Slip Pads to Protect Your Desk
A printed holder can have a hard surface on its bottom and can slide on smooth desks. It is possible to place tiny rubber or silicone underbelly pads. This not only makes the holder steady, but also prevents the desk scratches. Self-grip pads are simple to use and fasten.
Painting and Smoothing for a Premium Look
In 3D printing, it is typical to have layer lines. Roughness can be removed by light sanding on exposed surfaces. You can also use spray paint to make the surface clean and smooth. Matte colours often work well for office use, while brighter colours can suit home setups.
Incorporating Labels or Colour Matching
You can add a little space or a flat piece on the front for labels. This assists in categorising magazines according to type or date. The other alternative is to print many holders with varying colours. This allows item sorting to be done quickly without having to check all of them.
FAQ
Will Standard A4 Magazines or Comic Books Fit in a 3D Printed Organiser?
It depends on your design. A4 magazines are taller and thicker, so you’ll need to give extra height and depth. Comic books are smaller, so they fit easily. Just leave a little extra space so your items slide in and out smoothly.
Do I Need to Use Supports When Printing a Magazine Holder?
For most simple designs, you don’t need supports. Only use them if your model has steep overhangs or curves. Keeping the design flat on the printer bed also helps avoid using supports.
How Can I Hide Visible Layer Lines Without Sanding?
Lower your layer height in the slicer for a smoother finish, or slow down your print speed. Another easy trick for FDM is to use matte filament to naturally hide lines. If you're using resin, there are other simple ways to deal with layer lines in resin 3D prints.
Conclusion
Making your own magazine holder with 3D printing is surprisingly simple. The size and shape can be adjusted to the size of your desktop or shelf. Division of large components or angling pieces into small pieces may be done to make printing easier and stronger.
Sometimes a small detail, such as sanding of rough edges, pasting on the anti-slip pads, or labels, can make it more functional and attractive. Finally, you'll finally have a practical, low-cost magazine holder. Once finished, try other useful resin 3D prints for your home to keep upgrading your workspace.
Teilen:
3D-gedrucktes Computergehäuse: Eine vollständige Anleitung zum Selbstausdrucken
Do You Need to Vent ABS When 3D Printing?