
There is a unique frustration familiar to every creator who uses resin 3D printing: investing in a state-of-the-art printer and premium resin, designing a model with beautiful, complex curves, and then pulling the finished part from the build plate only to find its elegant surfaces marred by a series of fine, distracting lines. This phenomenon, often described as a "contour map," "stair-step," or "terracing" effect, can undermine the perceived quality of an otherwise perfect print, transforming a smooth dome into a series of visible ridges or a subtle curve into a pixelated approximation. It is the final barrier that separates a good print from a professional, flawless object.
The purpose of this guide is to empower users—from miniature artists and jewelry designers to product engineers and high-end prototypers—with the knowledge and techniques required for achieving smooth surfaces and intricate details that rival the quality of traditional injection moulding.
Achieving this level of perfection is not about finding a single "magic setting" in your slicer software. Instead, it requires a holistic approach that recognizes 3D printing as an integrated system and is key to how to improve 3D print quality. A perfect surface is the result of a finely tuned workflow where software settings, hardware precision, material properties, and post-processing techniques work in concert. Each stage builds upon the last, from the initial digital slice to the final polished part. A weakness in one area can compromise the entire effort. This guide is structured around this philosophy, providing a complete methodology for optimizing the entire ecosystem. The foundation of this system begins with high-precision hardware and advanced materials engineered to work in harmony, an approach that is central to the design of the entire HeyGears ecosystem.
The Science Behind the Lines: A Diagnostic Guide
Before a solution can be applied, the problem must be correctly identified. Understanding how a resin 3D printer works is the first step. The lines that appear on resin prints are not all the same; they stem from different causes and require different remedies. Attempting to fix a hardware issue with a software setting is a common source of wasted time and material. Therefore, the first step toward a flawless surface is to become a diagnostician. Surface artifacts on resin prints can be broadly divided into two categories: those that are an inherent consequence of the technology (Artifacts of Discretization) and those that result from a failure in the printing process (Artifacts of Error).
Artifacts of Discretization: The Inherent Nature of Layered Manufacturing
These artifacts are a fundamental result of approximating a smooth, continuous surface using discrete, finite building blocks—layers and pixels. They cannot be truly "eliminated" in the raw print, but their visibility can be drastically reduced through intelligent mitigation strategies.
Z-Axis Layer Lines (Stair-Stepping)
Stair-stepping is the most common and recognizable artifact in 3D printing. It is the direct, physical representation of the slicing process, where a smooth, curved, or angled 3D model is translated into a stack of flat, two-dimensional layers of a fixed height. Each layer is a discrete step up in the Z-axis, and when these steps are used to build a slope, the result is a terraced or "staircase" effect.
The visibility of these steps is a matter of simple geometry. The vertical height of each "step" (the riser) is determined by the layer height setting in the slicer. On a steep surface, close to vertical, the horizontal width of each step (the tread) is very small. However, as the angle of the surface becomes shallower relative to the build plate, the geometry changes dramatically. To achieve the same gradual slope, the horizontal tread of each step must become significantly wider. This geometric magnification is precisely why stair-stepping is most pronounced on low-angle surfaces, such as the top of a sphere, the gentle curve of a shoulder, or the roof of a vehicle. The change in the curve is not just vertical; it is also horizontal, making the edge of each layer far more distinct. Mathematical models of surface roughness in additive manufacturing confirm that the angle of the surface with respect to the build direction is a primary variable in the prominence of this effect.

XY-Plane Voxel Lines (Aliasing)
While stair-stepping is a Z-axis phenomenon, a similar effect occurs in the XY plane. Masked Stereolithography (MSLA) and Digital Light Processing (DLP) printers use a pixelated screen (like an LCD or projector) to cure each layer. Each pixel on this 2D screen, when given a height (the layer thickness), becomes a three-dimensional rectangular brick known as a "voxel".
Just as it's impossible to draw a perfect circle with square building blocks, it's impossible for a grid of rectangular voxels to perfectly replicate a smooth curve in the XY plane. The printer must approximate the curve, resulting in a jagged, pixelated edge. This effect is known as aliasing, or "voxel lines". These lines are distinct from Z-axis layer lines and are most visible on surfaces that are nearly parallel to the build plate, where the cross-section of the curve is most apparent in the sliced image.
It is critical to understand the distinction between these two types of discretization artifacts. Z-axis stair-stepping is primarily addressed by adjusting the layer height, which controls the vertical resolution. XY-plane voxel lines are primarily addressed by anti-aliasing (AA), a software feature that controls the horizontal resolution at a sub-pixel level. Confusing the two will lead to ineffective troubleshooting.
Artifacts of Error: Identifying and Eliminating Process Failures
Unlike discretization artifacts, these lines are not inherent to the technology but are caused by mechanical, chemical, or procedural failures. The goal with these artifacts is not mitigation but complete elimination by addressing the root cause.
Mechanical Instability (Z-Wobble)
If the horizontal lines on a print appear in a repeating, cyclical pattern and are more pronounced than typical layer lines, the cause may be mechanical instability in the Z-axis. A slightly bent or misaligned Z-axis threaded rod, or a loose lead screw nut, can cause the build platform to shift slightly side-to-side as it moves up and down. This "wobble" introduces inconsistencies in layer placement, resulting in visible banding on the print's surface. This is a hardware failure that no amount of slicer adjustment can fix.
Layer Shifts
A layer shift is a severe and obvious defect where one or more layers are suddenly offset from the rest of the print, creating a dramatic line or step. In Fused Deposition Modelling (FDM) printing, this is often caused by loose belts or slipping pulleys. While less common in resin printing, similar misalignments can occur due to major mechanical failures, significant external vibrations that move the printer, or extreme peel forces that cause the part to shift on its supports mid-print.
Inconsistent Curing
Any factor that disrupts the consistent, layer-by-layer curing process can introduce a visible line on the final print. These factors are often related to changes in the chemical and physical environment of the print.
-
Pausing a Print: When a print is paused, the already-cured portion of the model is left stationary in the resin vat. During this time, the resin continues its natural shrinkage process. When the print resumes, the new layer cures onto a part that has shrunk more than it would have during a continuous print, creating a distinct line of misalignment at the pause point. It is therefore advisable to avoid pausing prints unless necessary.
-
Sudden Cross-Sectional Changes: A model that transitions abruptly from a very small cross-sectional area to a huge one can exhibit lines at the point of transition. This is due to a sudden and dramatic change in the peel forces required to separate the newly cured layer from the FEP or PFA film. This change in mechanical stress can cause a slight deformation or shift in the part, manifesting as a visible line. This is also related to variable shrinkage; a larger volume of resin in a single layer will shrink differently than a smaller volume, causing stress at the boundary.
-
Exposure Changes: Some advanced slicers allow for different exposure times at different sections of a model. While this can be a useful tool, introducing alterations to exposure times for model layers almost always leads to the emergence of noticeable surface lines. Each exposure setting results in a slightly different degree of cure and shrinkage, and the boundary between these zones will be visible.
The Digital Fix: Optimizing Your Slicer for a Perfect Foundation
Once the type of line has been diagnosed, the first line of defence is the slicer software. This is where the unavoidable artifacts of discretization are mitigated before the print even begins. By making intelligent choices about how the 3D model is oriented and sliced, the visibility of stair-stepping and voxel lines can be dramatically reduced.
The Golden Rule: Strategic Model Orientation
Model orientation is the single most powerful and effective tool for controlling the appearance of layer lines. Since stair-stepping is most visible on shallow-angled surfaces, the primary goal of orientation is to ensure that the most aesthetically critical surfaces of a model are positioned at a steep angle relative to the build plate. This strategy doesn't eliminate the lines; it strategically relocates them to less important or less visible areas, such as the back, underside, or areas that will be obscured after assembly.

Recommended Angles
While the optimal angle is model-dependent, several best practices and rules of thumb have emerged from the community and extensive testing.
-
The 45-Degree Rule: Orienting a model at a 45-degree angle is a widely adopted starting point. It provides a good general-purpose balance between reducing the stair-step effect on most surfaces, minimizing the cross-sectional area of each layer (which reduces peel forces), and providing good locations for adding supports that are easy to remove.
-
The 60 to 75-Degree Range: For models where surface finish is paramount, such as character busts or display pieces, tilting the model to a steeper angle, often between 60 and 75 degrees from the vertical, can yield superior results. This steep angle ensures that the primary viewing surfaces have minimal stair-stepping, effectively hiding the layer lines from a normal viewing perspective. This also allows supports to be placed almost entirely on the back or bottom of the model, preserving the pristine finish of the front surfaces.
-
The Arctangent Angle (${\approx}40.6^{\circ}$): For hard-surface models with large, perfectly flat, angled planes, a specific mathematical angle exists that can make layer stepping least noticeable. This angle is the arctangent of the layer height divided by the pixel width. While mathematically interesting, its practical application is limited, as most models feature complex curves and multiple surface angles where this "perfect" angle would not apply uniformly.
The practical takeaway is to load the model into the slicer and analyze its geometry. Identify the "money shot"—the angle from which it will be most frequently viewed. Then, rotate and tilt the model so that those critical surfaces are as steep as possible, without creating excessive overhangs that would require difficult-to-remove supports.
Layer Height: Finding the Sweet Spot Between Quality and Time
The relationship between layer height and surface smoothness is direct and intuitive: a smaller layer height results in smaller vertical steps, which produce a smoother approximation of a curve. Halving the layer height, for example, from 0.05 mm to 0.025 mm, can dramatically reduce the appearance of stair-stepping. However, this comes at the cost of significantly increased print time, as the printer must now process twice as many layers.
The Point of Diminishing Returns
While it is tempting to simply use the lowest possible layer height your printer allows, there is a point of diminishing returns. The visual improvement gained by moving from a 30-micron ($0.03$ mm) layer height to a 10-micron ($0.01$ mm) layer height can be nearly imperceptible to the naked eye, yet it can triple the print time and increase wear on the printer's FEP/PFA film and Z-axis motor. Furthermore, there are physical limitations to how thin layers can be. Very viscous resins may struggle to flow quickly enough to evenly fill the microscopic gap created by a sub-20-micron layer height before curing begins. Additionally, the Z-axis stepper motor has a minimum physical step resolution, which can limit the practical minimum layer height.
Recommended Settings
Finding the right balance between quality and speed is key. The following settings serve as excellent starting points for various applications:
-
100 Microns ($0.1$ mm): Best suited for large-scale prototypes or functional parts where surface finish is not a primary concern and speed is the highest priority. Layer lines will be visible.
-
50 Microns ($0.05$ mm): This is the industry standard and the default for most slicers. It offers an excellent balance between detail, surface quality, and print time, making it a versatile choice for a wide range of applications. Layer lines are typically not noticeable without close inspection.
-
25-30 Microns ($0.025-0.03$ mm): This range is often considered the "sweet spot" for high-detail applications like tabletop miniatures, jewelry, and intricate scale models. At this resolution, Z-axis layer lines become nearly invisible to the naked eye, providing a premium surface finish without the extreme time penalty of even lower settings.
Mastering Anti-Aliasing (AA): Your Weapon Against Voxel Lines
Anti-aliasing is a powerful software technique designed specifically to combat the XY-plane voxel lines caused by the pixelated nature of the printer's screen. It does not affect Z-axis layer height but instead works to smooth the contours of each individual 2D layer slice.
How it Works
AA functions by effectively increasing the printer's horizontal (XY) resolution through a clever use of greyscale. Instead of a pixel being simply "on" (white) or "off" (black), AA introduces intermediate shades of grey. A grey pixel transmits less UV light than a white pixel, which causes the resin in that voxel to be only partially cured. This partially cured, smaller volume of resin helps to smooth the transition between the hard edges of fully "on" and fully "off" pixels, effectively filling in the "jaggies" of an aliased curve. This process is more accurately described as sub-pixel rendering, as it allows the printer to create features smaller than a single native pixel.
The Settings Explained
Modern slicers offer several parameters to control the AA effect. Understanding them is crucial for achieving the desired balance between smoothness and sharpness.
-
AA Level: This setting (often represented as 2x, 4x, 8x, etc.) determines the number of greyscale levels that will be used to smooth the edges. A higher level provides a more gradual and smoother transition, but can increase the slicer's processing time and the final file size. For most high-resolution printers, a setting of 4x or 8x is a common and effective choice.
-
Image Blur: This parameter applies a slight Gaussian blur to the entire layer image after the initial AA calculation. It can further soften the edges and is particularly effective for highly organic or cartoonish models with no sharp details. However, it should be used with caution, as it can soften intended sharp details on hard-surface models and may even interfere with the effectiveness of the primary AA algorithm if set too high. A blur radius of 2 pixels is a common starting point for smooth surfaces.
-
Grey Offset: This is an advanced but critical setting for fine-tuning AA performance. It adjusts the baseline grey value from which the AA gradient begins. Different resins have different levels of reactivity to UV light. A highly reactive resin might fully cure even when exposed to a light grey pixel, negating the AA effect. By increasing the grey offset, the user can make the starting point of the gradient "more grey," ensuring that the sub-pixel voxels are only partially cured as intended. Calibrating this setting for a specific resin is key to unlocking the full potential of anti-aliasing.
The Detail vs. Smoothness Trade-off
There is a persistent debate about whether AA causes a loss of fine detail. The reality is nuanced. Poorly configured AA, particularly with excessive image blur, can certainly soften sharp edges and obscure micro-textures. However, when properly calibrated—using an appropriate AA level and a carefully tuned grey offset, with minimal to no blur—the technique primarily targets and smooths the unwanted artifacts of aliasing on curved surfaces. It does not inherently reduce the intended sharpness of the model's geometry. The trade-off is not a simple one of "detail vs. smoothness," but rather one of "aliasing artifacts vs. potential softening." For most applications, the benefit of removing jagged voxel lines far outweighs any minimal risk of detail loss.
Table: Recommended Slicer Profiles
To distill this information into actionable starting points, the following table provides recommended slicer profiles for common printing scenarios. These should be considered a foundation for further fine-tuning based on the specific printer and resin in use.
|
Desired Outcome |
Orientation |
Layer Height |
Anti-Aliasing (AA) Profile |
Best For |
|
Maximum Detail Fidelity |
Angled (45°+) |
20-30 µm |
On (e.g., Level 4-8, No Blur, Calibrated Grey Offset) |
Miniatures, Jewelry, Textured Surfaces |
|
Ultra-Smooth Organic Surfaces |
Angled (45°+) |
30-50 µm |
On (e.g., Level 8, Image Blur 2px, Calibrated Grey Offset) |
Busts, Sculptures, Cartoon-style figures |
|
Fast Functional Prototypes |
Optimized for speed & strength |
50-100 µm |
Off or Minimal (e.g., Level 2) |
Engineering parts, Jigs, Fixtures |
The Physical Foundation: Optimizing Hardware and Materials
The most meticulously prepared digital file will fail to produce a flawless print if the physical foundation—the printer and the resin—is not up to the task. The holistic system approach demands that the hardware and materials be considered not as separate variables, but as integral components of the surface quality equation. The best digital settings can only be realized on a stable, precise physical platform.
The Role of a High-Precision Printer
Premium resin 3D printers are specifically engineered to minimize or eliminate the "Artifacts of Error" discussed earlier. Features that ensure mechanical rigidity, positional accuracy, and process stability are not luxury add-ons; they are essential for achieving professional-grade surface finishes consistently.

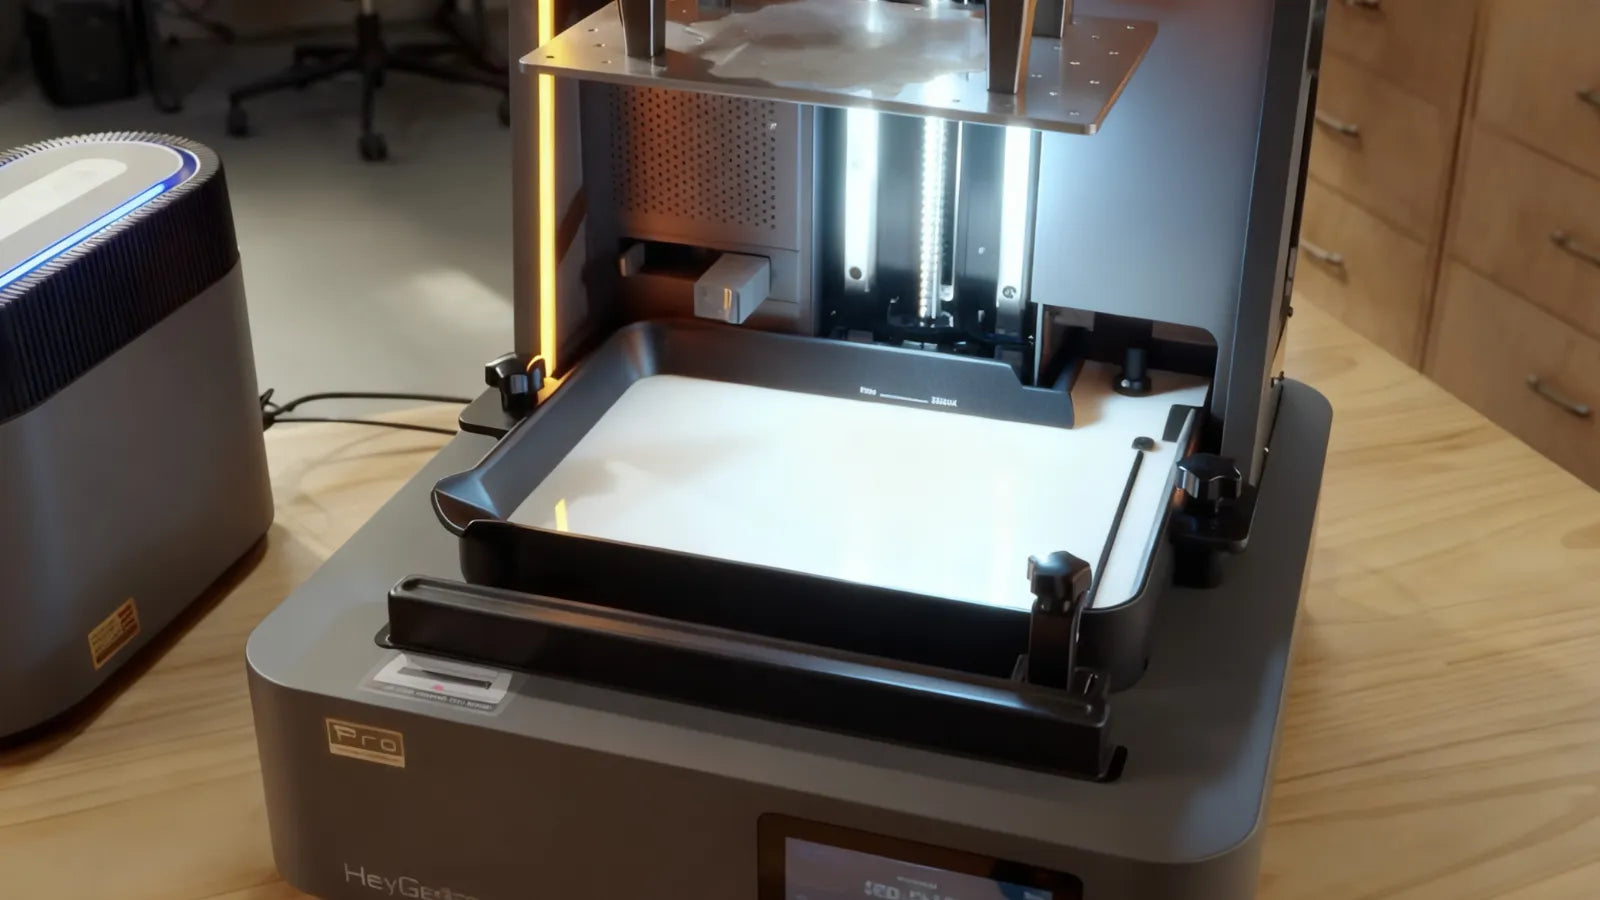
The Reflex 2 3D Printer serves as an excellent case study in how hardware engineering directly contributes to surface perfection. Several of its key features are designed to combat the root causes of layer inconsistencies:
-
C5 Grade Z-axis Module: This industrial-grade component provides a repeat positioning accuracy of just ±2 micrometres. This level of precision effectively eliminates Z-wobble as a source of error, ensuring that every single layer is placed exactly where the slicer intended, without any cyclical deviation.
-
Die-Cast Unibody Base: By constructing the printer's base from a single, rigid piece of die-cast metal, cumulative tolerances from multiple assembled parts are eliminated. This enhances the overall rigidity of the machine, dampening micro-vibrations and further stabilizing the Z-axis to prevent any artifacts caused by mechanical instability.
-
Dynamic Motion Algorithm 3.0: This intelligent system uses high-sensitivity force sensors to provide real-time feedback on the peel forces during printing. It can then dynamically adjust lift and retract speeds to prevent excessive stress on the model, mitigating the risk of layer shifts or deformations caused by abrupt changes in cross-sectional area.
By building the printing process on such a stable and precise foundation, the user can be confident that the lines they see on their prints are artifacts of discretization, which can be managed with software, rather than random errors from the hardware itself.
Choosing the Right Resin for a Smooth Finish
The liquid resin is not merely a consumable; it is an active and critical performance component in the printing system. Its chemical properties have a direct impact on detail resolution, surface smoothness, and the effectiveness of advanced slicer settings like anti-aliasing.
Key Resin Properties for Surface Quality
-
Low Shrinkage: All photopolymer resins shrink to some degree as they cure. However, resins formulated for low shrinkage are significantly less prone to developing internal stresses that can manifest as surface lines, particularly at points of high volumetric change or during print pauses.
-
Pigmentation and Light Bleed: The type and density of pigments in a resin control how light scatters within the liquid. Heavily pigmented, opaque resins (sometimes referred to as "slow" or "crisp" resins) limit light bleed, preventing UV light from scattering beyond the intended pixel and curing adjacent resin. This results in sharper details and, crucially, allows the subtle greyscale gradients of anti-aliasing to perform their sub-voxel curing with much greater precision and control.
-
Viscosity: The viscosity of a resin determines how easily it flows. For printing at ultra-low layer heights (below 30 microns), a lower-viscosity resin is preferable as it can more quickly and completely flow back into the narrow gap between the part and the FEP/PFA film after the build plate retracts, in a uniform layer for the next exposure.
HeyGears offers a portfolio of resins engineered for specific outcomes. For example, the PAP10 Precise Detail Resin is formulated for high fracture toughness and the ability to resolve extremely fine details, making it ideal for the best resin for miniatures where every texture matters. Meanwhile, the UltraPrint-Modelling PAS10 Standard Modelling Resin is designed to produce a smooth, matte surface with near-invisible layer lines, perfect for scale replicas and design prototypes. Using a resin that is optimized for the desired outcome provides a significant head start in the quest for a perfect surface.
The Finisher's Workflow: Post-Processing for a Flawless Surface
The final stage of achieving a truly flawless, injection-mould-quality surface occurs after the print is finished. Post-processing is not a remedial step to fix a bad print; it is a finishing process designed to take a great print and elevate it to perfection. This is where the last, faint traces of the printing process are physically removed, pushing the remaining microscopic artifacts well below the threshold of human perception.
Step 1: Precision Sanding for a Glass-Like Foundation
Sanding is the most effective method for physically levelling the microscopic peaks and valleys of layer lines. For resin prints, wet sanding is the superior technique, as it produces a finer finish and is safer for the user.
Preparation and Technique
Before any sanding begins, the part must be thoroughly washed to clean the 3D resin print and remove all residual uncured resin, and then fully post-cured to achieve its final hardness and chemical stability. Sanding a soft, under-cured, or resin-coated part is ineffective and can expose the user to uncured chemicals.
The technique of wet sanding involves using waterproof sandpaper and dipping it in water before and during the sanding process. The water acts as a lubricant, preventing the sandpaper from clogging with resin dust. It also keeps the surface of the print cool, preventing any heat buildup from friction that could soften or smear the plastic. Most importantly, it traps the fine dust particles in a slurry, preventing them from becoming airborne where they could be inhaled.
Grit Progression Guide
The key to successful sanding is a gradual progression through increasingly fine grits of sandpaper. Skipping a grit level will leave deep scratches from the coarser paper that the finer paper cannot remove. A methodical approach is essential.
-
Initial Smoothing (220-400 grit): This stage is for removing any remaining support marks or nubs and for knocking down the most prominent layer lines on very curved surfaces. Begin with 220 or 320 grit sandpaper, using light, circular motions. The goal is not to remove all lines, but to create a uniform, matte surface. Use sanding sponges or wrap sandpaper around a foam block to apply even pressure on curved areas.
-
Refining the Surface (600-800 grit): After wiping the part clean, move to a finer 600 or 800 grit paper. This step will remove the finer scratches left by the previous stage. The surface should now feel exceptionally smooth to the touch. Any visible layer lines should be gone, replaced by a very fine, uniform texture from the sandpaper itself.
-
Polishing (1000-2000+ grit): For surfaces that will be painted with a high-gloss finish or left unpainted, a final polishing stage with ultra-fine grits is necessary. Progressing through 1000, 1500, and 2000 grit wet sandpaper will remove the last microscopic scratches and bring the surface to a satin or even semi-gloss sheen.
Step 2: Applying Sandable Filler Primer
Priming is the final preparatory step before painting, and it plays a crucial role in achieving a perfect finish. Using a high-quality, sandable filler primer serves two critical functions:
Imperfection Revealer and Surface Filler
The flat, neutral grey colour of most primers provides a uniform surface that makes it easy to spot any remaining microscopic imperfections, pinholes, or scratches that were missed during sanding. A "filler" or "sandable" primer is formulated to be slightly thicker than standard primers. It is designed to fill in the microscopic valleys of any remaining layer lines or sanding scratches, creating a perfectly smooth, uniform base for paint to adhere to.
Application Technique
The key to a good primer coat is to build it up with multiple thin layers rather than one heavy one. A thick coat will fill in and obscure the fine details of the model.
-
Mount the sanded and cleaned part on a dowel or handle to allow for easy manipulation without touching the surface.
-
Using a spray primer from a can, apply a very light "tack coat" from a distance of 6-8 inches. Use short, sweeping motions, starting the spray before the part and ending it after the part to avoid drips.
-
Allow this coat to dry for a few minutes, then apply another thin, even coat. Repeat this process until the part has a uniform, opaque colour. Allow the primer to cure completely according to the manufacturer's instructions, which can take several hours.
The Final Polish
Once the primer is fully cured, perform one last, very gentle wet sanding with an ultra-fine grit sandpaper (e.g., 800-1000 grit). This step smooths the primer itself, removing any "orange peel" texture from the spray and creating the ultimate, glass-smooth foundation for painting. After this final polish, you are ready to learn how to paint resin 3D prints for a professional finish, and the surface should be indistinguishable from that of a high-quality, injection-moulded object.

Conclusion: Is a "Perfectly Smooth" Print Possible?
The journey from a digital model to a physical object with a flawless surface is a multi-stage process that demands both technical knowledge and meticulous execution. It begins with a correct diagnosis of the surface artifacts—distinguishing between the inherent artifacts of discretization and the correctable artifacts of error. It progresses through the digital realm, where strategic model orientation, optimized layer heights, and carefully calibrated anti-aliasing settings are used to mitigate the visibility of stair-stepping and voxel lines. This digital preparation is then built upon a stable physical foundation, where a high-precision printer and a high-performance resin ensure that the digital instructions are translated into a physical part with maximum fidelity. Finally, the process culminates in the finisher's workflow, where the skilled application of sanding and priming techniques physically erases the last microscopic traces of the layered manufacturing process.
To return to the fundamental question: can layer lines be completely eliminated? The answer is a nuanced yes. While it is true that microscopic layer lines are an inescapable, fundamental limitation of the layer-by-layer technology, it is absolutely possible to create a final, finished object that is perceptually flawless. The goal is not to achieve an atomically smooth surface on the raw print, but to reduce the visibility of all artifacts below the threshold of human perception. When the holistic workflow outlined in this guide is applied systematically, the stair-steps are minimized, the voxel lines are smoothed, and the last remaining traces are physically levelled and filled, resulting in a surface that, to the eye and to the touch, is perfect.
This level of quality is not the result of a single setting or a secret trick. It is the outcome of a comprehensive approach that treats 3D printing as a complete system. By embracing this workflow, creators can elevate their craft and consistently produce parts that meet the highest standards of professional quality. Starting this journey with an integrated ecosystem of hardware and materials, such as the one offered by HeyGears, provides the best possible foundation for achieving these exceptional results.
共有:
10 Useful 3D Printing Applications with Reflex 2 3D Printer
From Prototyping to Production: The Power of Large Format 3D Printing with Reflex 2 Pro