
A book stand keeps your book open at a comfortable reading angle. It makes reading, cooking, and desk work easier for you. By 3D printing your own, you can make a stand that fits your desk, holds your books securely, and matches your style and preferences.
Let’s take a glance at how you can 3D print a durable book stand using beginner-friendly tools and resins. And 5 steps to prepare, print, and finish the stand to shape a strong, stable stand for everyday use.
Why Choose a 3D Printed Book Stand
Making a 3D printed book stand lets you design, print, and finish a useful item in one go. You can adjust size, reading angle, and base size to suit your desk and the types of books you read. Here are the distinctive advantages of a 3D printed book stand:
Flawless Surface Finish
Resin printers can produce smooth surfaces with very fine layer resolution. Few-layer lines indicate the book will not be scratched on the cover. Smooth surfaces also reduce the friction applied and make the books slide over and off the stand more conveniently.
Solid Weight and Stability
Resin-made parts are often inherently dense when compared to regular FDM prints. Together with a large or slanted base, the stand does not tip up even when a bigger book is in it. Fitting of supports in appropriate locations during printing makes the printing flat and avoids toppling.
Clear and Specialty Resins
Resin printing also provides you with flexibility in material choice. You can choose transparent resins if you want a clear or glossy stand that blends into your desk setup.
ABS-like or engineering resins are highly rigid, impact-resistant, and usually less likely to warp to achieve functional strength. These are particularly used for components whose supports are thin or cantilevered.
Durability for Heavy Books
You can mitigate bending, cracking, and layer separation by using durable resins. Moreover, try to place the model in the right position during printing. This way, the stand can support heavy textbooks, cookbooks, and reference books without being distorted over the years.
Essential Materials and 3D Printing Tools
When 3D printing a book stand, choose the right resin printer, resin, and post-processing tools. These ensure your stand comes out strong, accurate, and ready to use.
Select a Desktop Resin Printer.
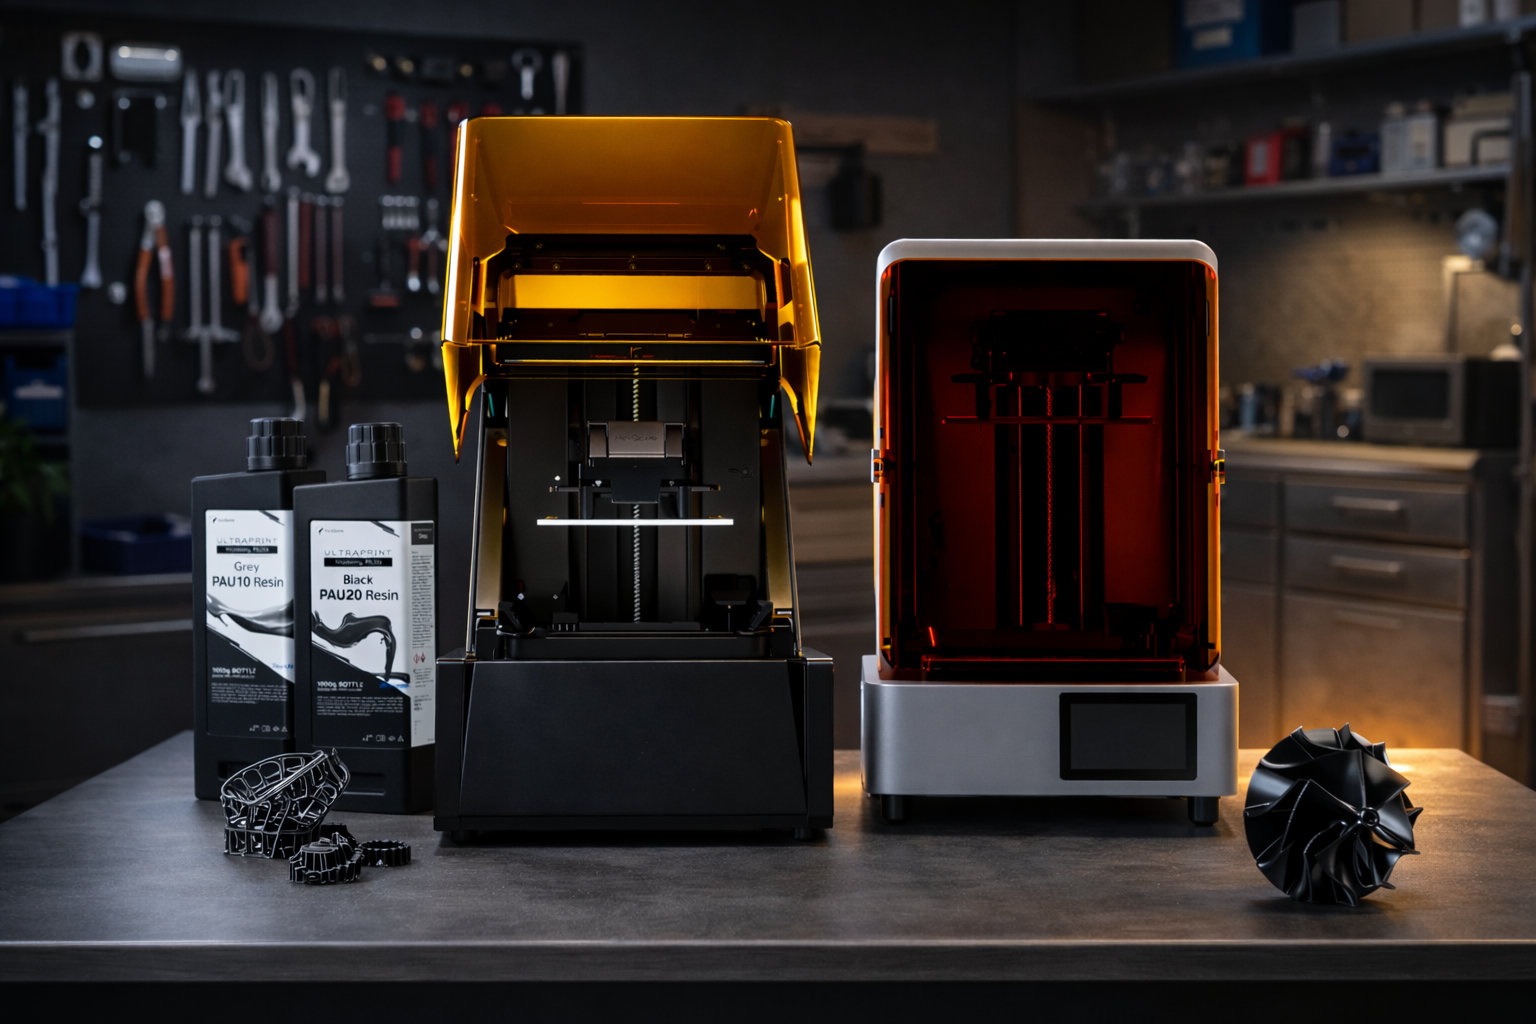
The HeyGears Reflex 3D Printer is the best option among beginners and hobbyists who want to do high-quality prints. It provides precision in an automated workflow similar to industrial quality and is easy to set up. Here are its major technical features:
-
385+ nm UV light source for faster and stronger resin curing.
-
Z-axis repositioning accuracy of ±2 µm for stable layer alignment.
-
Auto resin level detection and a heated tray to maintain optimal resin conditions.
-
AI-assisted peeling force management for consistent print layer adhesion.
-
33 μm XY precision and 50 μm layer thickness for fine detail restoration.
For users working with high-viscosity resins, the upgraded Reflex 2 3D printer features a newly reinforced, pressure-resistant screen for maximum durability.

Select Tough or ABS-Like Resins
For functional book stands, ABS-like or high-toughness resins are recommended:
-
PAU 10 Resin: ABS-like, strong and stable, ideal for detailed functional prints.
-
PAU 20 Resin: High-toughness tooling resin. If your parts require extra durability and impact resistance, using PAU 20 Resin is a reliable choice.
These resins maintain dimensional stability and smooth surfaces while supporting heavy books without cracking.

Use a Wash and Cure Station
Post-processing is critical for resin prints. A wash and cure station removes residual resin and fully polymerizes the model to achieve maximum mechanical strength. Proper curing prevents deformation and enhances surface hardness.
Prepare Basic Safety Gear
Working with resins requires adherence to strict safety precautions: For instance:
-
Always make sure to use nitrile gloves to avoid skin contact.
-
Wear safety goggles for chemical protection.
-
A ventilated workspace or fume extractor to handle resin fumes.
Download and Slice Book Stand STLs
Before printing:
-
Obtain a validated book stand STL file compatible with your slicer.
-
Use slicing software to orient the model, add supports, and adjust layer height to match the printer’s XY and Z precision.
-
Verify resin compatibility and layer curing time based on PAU 10 or PAU 20 specifications.
Table: Summarizing 3D Printing Materials and Tools
|
Tool/Material |
Purpose |
Features |
|
Reflex 3D Printer |
Prints the book stand |
385+ nm UV light, ±2 µm Z-axis, auto resin detection, heated tray, AI-assisted peeling |
|
PAU 10 Resin |
ABS-like functional parts |
Strong, stable, smooth surface finish, ideal for heavy books |
|
PAU 20 Resin |
High-toughness parts |
Extra durability and impact resistance, retains shape under load |
|
Wash and Cure Station |
Post-processing |
Cleans residual resin and fully cures parts for strength |
|
Nitrile Gloves and Goggles |
Safety |
Protects skin and eyes from resin contact |
|
Ventilated Workspace / Fume Extractor |
Safety |
Removes fumes for safe resin handling |
|
STL Files and Slicer Software |
Model preparation |
Orient model, add supports, set layer height, and curing time |
Step-by-Step Guide to Printing Your Book Stand
To illustrate the procedure, here we have an example of a HeyGears Reflex series resin printer with PAU 10 ABS-like resin. The process is in line with a conventional resin printing procedure: assume the model, print the object, and finalize the rudimentary post-processing measures. Using these steps, a stable and aesthetic book stand can be manufactured for daily use.
Step 1: Orient the Model in Your Slicer
Load the book stand STL to your slicer and review the model orientation. Tilt the model slightly instead of printing it perfectly flat. This helps minimize suction forces during printing and enhances the stability of layers.
Add support and overhangs for the areas that are extending or not touching the build plate directly. Good orientation and support placement will prevent print failures and improve the surface quality.
Step 2: Load the Resin and Start Printing
The resin in the printer vat is filled with PAU 10 resin that offers good strength and is durable for functional parts. After loading the resin, take the cut file and place it inside the printer, and start the job.
Controlled light exposure is incorporated to build the model layer by layer on the printer. The printing time will depend on the stand size and the settings of the layer.
Step 3: Wash the Print and Remove Supports
Once printing is completed, separate the print stand and the build plate. Chances are high that there can be uncured resin remaining on the surface, and thus, the model must be washed.
Put the print in a washing station or cleaning container to get rid of excess resin, following proper methods on how to clean resin prints with alcohol and water. Cleaned support structures should be removed using cutters.
Step 4: UV Cure the Model for Maximum Strength
Wash the model, then put it in a UV curing station. This process completely hardens the material and enhances the printed part's strength. Curing is done to ensure that the stands remain durable and rigid in a position to support books.
Step 5: Sand the Surface for a Smooth Finish
For the final step, lightly sand areas where supports were attached. Small marks can be polished using fine sandpaper to improve the general look of the stand.

Maintenance and Care for Consistent Professional Results
Regular maintenance keeps your 3D printed book stands in order and running efficiently in a reliable manner. Below are a few easy steps that will help you save time and avoid frequent printing issues.
Maintain Smooth Surfaces
After washing your print and removing support overhangs, check the surface to ensure all the resin or other minute marks are gone. Treat the cured areas with care and use sharp tools that will not scratch the surface. The support points are sanded or polished to a light finish to keep the stand smooth and aesthetically clean.
Reduce Print Failures
It is recommended to check your model position and support position before starting a new print. Make sure that the build plate is flat and the resin is uniformly mixed. The correct installation helps you lower suction forces and layer lifting or failed prints, particularly on larger or heavier book supports.
Extend Vat and Build Plate Life
-
Carefully fill the resin vat after printing to remove all leftover resin.
-
Do not scrape the vat film or use sharp objects.
-
Check the vat and build plate regularly for scratches or damage.
-
Regular cleaning and handling extend the lifespan and maintain print quality.
FAQ
Why Choose Resin over FDM for a Book Stand?
Generally, resin printing makes smooth surfaces and detailed parts. This helps the stand hold the books firmly, remains durable, and lasts longer compared with FDM printing.
Will the Resin Surface Scratch or Damage My Book Covers?
No, if the surface is properly cleaned and lightly sanded, resin prints are smooth enough to protect your book covers.
Can a Resin 3D Printed Stand Hold Heavy Medical or Law Textbooks?
Yes, the stand can support heavy books without bending and cracking by using strong resins like PAU 10 and proper print orientation.
Conclusion
A 3D printed book stand makes reading or working easier by holding your books at a comfortable angle. Using a good resin 3d printer and strong resin gives a stable, long-lasting stand. With simple printing and finishing steps, you can make a sturdy, smooth stand that works well for heavy books every day.
共有:
3D Printed Miniatures: Everything You Need to Know to Start
3D Printed Gifts: 10 Unique Ideas and How to Print Them